Showing posts with label WEB 8. Show all posts

Monday 3 September 2018

Installing SDL Content Delivery Microservices in Docker

In the last couple of blogs, we learned how to use Docker with SDL DXA Html-Theming and SDL DXA. Today we are going to setup Microservices in Docker. The microservices, also called Content Interaction Services, are the server-side components of Content Delivery. The Microservices is based on Java Spring-boot which uses embedded Tomcat to run the Services.

To learn more about SDL DXA, DXA Html-theming and SDL WEB with docker, please follow below links.
  1. SDL WEB, Docker and Cloud Containerization
  2. Run DXA in Docker
  3. DXA theming in Docker
After this, we can say that we managed to run SDL Content Delivery Environment in Docker.

I downloaded the latest CD HotFix from SDL FTP. In this blog, we are going to Install Content and Context Microservices in docker.

Steps:-
  1. Download the latest CD HotFixes.
  2. Create a new Folder and copy the Content standalone folder in it.
  3. Configure cd_Storage_conf.xml file.
  4. Copy License file in the config folder.
  5. Update Logback.xml
  6. Create Docker File in the root.
Docker File
1:  FROM java:8  
2:  COPY Contentstandalone /  
3:  RUN chmod +x /bin/start.sh  
4:  CMD bash -C '/bin/start.sh'  
5:  EXPOSE 8091  
Next, is we need to BUILD the Docker container.
 docker build -t content-service-staging .  
If everything goes well and it builds successfully next is RUN it.
 docker run -p 8091:8091 content-service-staging  

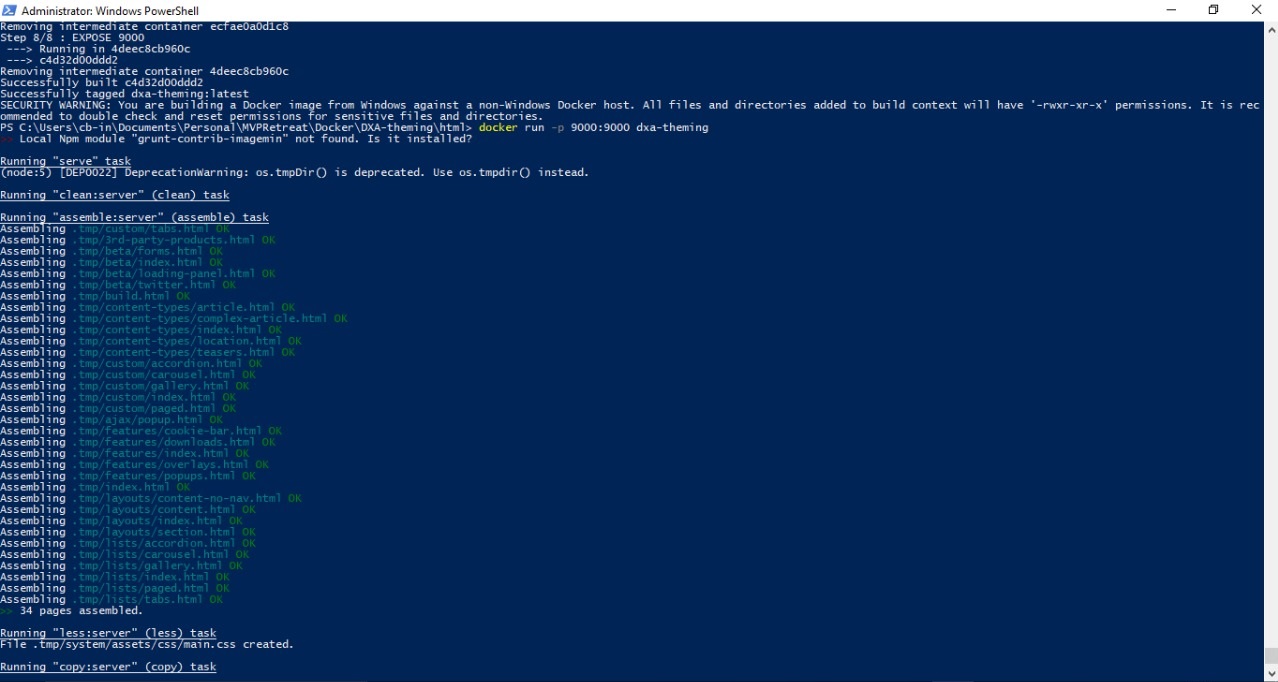
Below is the output of the above command.

Build Container 


Run the docker container 
Let's browse the Content service


Content Microservice running in Docker

SDL Content Microservice is up and running. Similarly, I followed the same steps in order to install the Context Microservice.

Context Microservice

Context Microservice is up and running in Docker

So, We've Dockerised SDL Content and Context Microservices, it was quick and simple most of the changes/configuration we did is the standard part of the installation of the SDL Microservices.

Happy Coding and Keep Sharing !!!!

Sunday 29 July 2018

Scaling SDL WEB 8.5 Installing CM and Publisher on Dedicated Machines

One of the biggest advantages of using SDL WEB (Tridion) is its scalability features. Last week, I was working on a task where I need to implement/Configure highly scalable SDL WEB 8.5 infrastructure.

Today, we are going to see one of them and that is "How to install CM and Publishers on Dedicated machines" to improve publishing efficiency.


Step I followed to configure CME and Publisher on a dedicated machine.

  1. Install all the core components on your content manager server
  2. Fill all the Database/ Website/ Topology related details.
  3. Once your setup is completed and you are able to browse CME go to windows service and disable the following services from content manager server. 
    1. Tridion Content Distributor Transport Service
    2. Tridion Content Manager Publisher Service
    3. This will stop the content manager server from doing the publishing
Set up Publisher servers
  1. Run the installer again on Publisher servers.
  2. Fill all the DB details and user accounts details.
  3. Transfer the cd_transport_conf.xml file from Content Manager Server to the same location on the new Publisher Servers.
  4. On Publisher servers we need to stop/disable the following services.
    1. Tridion Content Manager Workflow Agent Service
    2. Tridion Content Manager Service Host Service
    3. Tridion Content Manager Search Indexer
    4. Tridion Content Manager Batch Processor Service
  5. Restart the following services 
    1. Tridion Content Distributor Transport Service
    2. Tridion Content Manager Publisher Service
Now, new publisher servers are ready to publish and transport the package to the deployers. We can scale this further depending upon the requirement. 


Happy Coding and Keep Sharing !!! 


Saturday 28 July 2018

SDL Web, Docker and Cloud Containerization

What are containers


       Containers are a way to package software in a format that can run isolated on a shared operating system.
       A container wraps an application in a complete package that contains everything to run the application – code, libraries, dependencies, runtimes.
       A container image is a lightweight, stand-alone, executable package of a piece of software that includes everything needed to run it: code, runtime, system tools, system libraries, settings. Available for both Linux and Windows-based apps, the containerized software will always run the same, regardless of the environment
       Containers isolate software from its surroundings, for example, differences between development and staging environments and help reduce conflicts between teams running different software on the same infrastructure.

What is Docker


       Docker is a leading platform for Containerization of the application
       Docker allows you to package all pieces of your application into a single container so that your application will run same everywhere without worrying about the environment dependency and complexities.
       Docker is a tool that is designed to benefit both developers and system administrators, making it a part of many DevOps.
       For developers, it means that they can focus on writing code without worrying about the system that it will ultimately be running on.
       In a way, Docker is a bit like a virtual machine. But unlike a virtual machine, rather than creating a whole virtual operating system.
       It is a tool designed to make it easier to create, deploy, and run applications by using containers. Containers allow a developer to package up an application with all of the parts it needs, such as libraries and other dependencies, and ship it all out as one package.

Containers Vs Virtual Machine


       Containers are an abstraction at the app layer that packages code and dependencies together. 
       Containers take up less space than VMs
       Virtual machines (VMs) are an abstraction of physical hardware turning one server into many servers
       Each VM includes a full copy of an operating system. VMs can also be slow to boot


Docker Advantages


          Automation of repetitive and tedious deployment tasks.
          Faster onboarding of new resource.
          Faster shipment of new features and fixes without downtime.
          Easy and real-time scaling of application.
          Easy Distribution, Share, and Configuration of applications.
          High security out of the box.
          Improve efficiency of DevOps.
          Modernize traditional apps faster and without investing huge without going through complete SDLC.

Docker Disadvantages


          Better performance than Virtual Machines but slower than Bare-Metal.
          Isolation and security are lesser as compared to the Virtual Machines.
          Storing data such that it is available even after the container is shut down is quite complicated.
       Not all applications benefit from containers – Cannot be blindly adopted for each and every application.

 Comparison between AWS, Google, and Azure Cloud Containerization


AWS Cloud – The AWS Cloud provides Amazon EC2 Container Services (Amazon ECS) which support container application and so let you run your Docker containers on a managed cluster of Amazon EC2 instances.

Google Cloud – Google offers Google Container Engine which lets you run Docker containers on Google Cloud.

MS Azure – Microsoft also offers Azure container service to allow deployment, management, and execution of Container applications.

Docker and SDL WEB 

With the release of SDL Web, the Dockerization becomes quite easy

SDL Web is quite Docker friendly because of the following:
·         Micro-service based architecture.
·         Parameterized config files.
             ·       License-free web application.

SDL WEB – Advantages of using Docker

  •         Great time and effort saving for DevOps
  •         Complexities of SDL CD Deployment is encapsulated and allows the non-Tridion experts to do the deployment.
  •         Scaling of servers is quite easy.
  •         The overall cost of resources will be optimized as compared to Virtual Machines.
   Happy Coding and Keep Sharing !!!!

Saturday 14 July 2018

SDL WEB and TLS 1.2 or higher

Are you still using the SSL/early TLS protocols? 


Do you work with partners or customers who haven’t yet started the migration away from SSL/early TLS to a more secure encryption protocol? It's time to say goodbye to SSL/early TLS and reducing the risk of being breached.

On 30 June 2018?

30 June 2018 is the deadline for disabling SSL/early TLS and implementing a more secure encryption protocol – TLS 1.1 or higher (TLS v1.2 is strongly encouraged) in order to meet the PCI Data Security Standard (PCI DSS).

What is TLS?

TLS stands for Transport Layer Security and is the successor to SSL (Secure Sockets Layer). However, both these terms are commonly thrown around a lot online and you might see them both referred to as simply SSL.  TLS provides secure communication between web browsers and servers. The connection itself is secure because symmetric cryptography is used to encrypt the data transmitted. The keys are uniquely generated for each connection and are based on a shared secret negotiated at the beginning of the session, also known as a TLS handshake. Many IP-based protocols, such as HTTPS, SMTP, POP3, FTP support TLS to encrypt data.

In my last project, we faced this issue where client's security and infra team enabled TLS 1.3 on servers and while implementing SDL WEB 8.5 we start getting this issue.

Issue because of TLS 1.3

After investigating and consulting it with SDL we've found the solution for this, SDL WEB 8.5 supports till 1.2 and for that, we need to make some adjustment in the registry. Below are the registry entry details that fixed the algorithm and TLS issue for us.

TLS 1.0
TLS 1.0 Client

TLS 1.1 Client

TLS 1.2 client

[HKEY_LOCAL_MACHINE\SOFTWARE\Microsoft\.NETFramework\v4.0.30319]"SchUseStrongCrypto"=dword:00000001
New Entry Required  

[HKEY_LOCAL_MACHINE\SOFTWARE\Wow6432Node\Microsoft\.NETFramework\v4.0.30319]"SchUseStrongCrypto"=dword:00000001
New Entry Required

Happy Coding and Keep Sharing !!!

Saturday 23 June 2018

SDL Tridion with IBM Watson Tone Analyzer

The Tone Analyzer service analyzes the tone of input content.

One of the advancements of artificial intelligence and machine learning to content management systems is understanding the performance of content. Content creators can analyze how content has come across to readers, which tone resonates with which audience.

As a content creator and marketer, being able to perform tone analyzing is one of the best features powered by machine learning. IBM Watson Tone Analyzer service as it detects emotional, social, and language tones in written text. The Tone Analyzer provides insight on how the content is coming across to readers, and for each sub-tone, it provides a score between 0 and 1 if the score is 0.75 or higher is considered most accurate.

In this article, we are going to see how we can use this service with SDL Tridion to analyze the website content tone. I have created an ASP.NET MVC application and used it as a custom page in Tridion.

Custom Page

 In this application, we have three sections.
  • Read data based on URL we enter and it will analyze the content tone. 
  • Analyzed data based on the custom text "your own text".
  • And last is "Endpoint is exposed it will take the text as input and returns JSON ".

Let's see how it works with the website URL, here we need to enter the URL of our website or any link that we want to analyze and the application will read all its HTML text attributes and its content. In the given example I have configured H1, H2, H3, H4 and P tags we can configure other tags as well. So any URL that we enter, the application will scan that webpage and extract the data of all the above attributes and send it to IBM Tone service to analyze. For the demo, I scanned the Analyzer web application itself to see how the content has come across to readers.

Analyzed Content by URL

Next, is custom text, Here you can enter the text manually and understand the tone before we actually published it or entering in any component.

Your Own Custom Text
The last one is an Endpoint that will take text input and returns JSON data. So if you want to use this service you can use this endpoint directly.

Endpoint

Finally, this is also available on Docker I pushed this on my Docker account you can download the docker image and explore the Tone Analyzer service. This has some limitation since I am using Dev account here, only limited service calls are allowed.

Docker Image


Happy Coding and Keep Sharing !!!!

Saturday 2 June 2018

SDL Tridion with IBM Watson Assistant

Well, in the past I've learned and worked on many CMS systems but got engaged with SDL Tridion and one thing I noticed that they all have all the common features available e;g. Targeting, Personalization, Experience manager (InLine Editing), Analytics, Content Management etc.

"It's time to make your CMS more intelligent."

 I would like to share my knowledge and findings on how we can use Artificial Intelligence and Machine Learning technique in SDL Tridion in the form of a ChatBot Assistant with the help of IBM Watson Assistant service. I've trained this BOT to help CMS user and answer most commonly and frequently asked questions.

Especially for non-technical users "Content Author" with their most frequently asked questions.  I trained this BOT to answer based on DXA implementation and on most common scenarios "it's still learning", but if you want you can educate it according to your CMS implementation.

  • "Who can give me access on CMS or any specific Publication "
  • "Where, I should create content as per the blueprint hierarchy"   
  • "Where I should create Templates"
  • "Where I should create schema"

To know more about IBM Watson Assistant please refer my blogs.


Today we are going to integrate IBM Waston Assistant sample ChatBot in SDL Tridion and for that, I have created an Alchemy Plugin. It as pretty simple and StraightForward. You can always extend the functionality, not limited to ChatBot only you will come to know once you start exploring it.

If you are new to Alchemy please visit us at WebStore and Alchemy4Tridion

Install Alchemy Plugin

Conversation between user and Watson

Happy coding and keep sharing !!!

Friday 20 October 2017

How to dockerize SDL DXA theming module

Docker keeps our code and its dependencies together and lets us more fully utilize our Infrastructure resources.

Today we are going to create a Docker image which contains SDL DXA-theming module before we begin we need to install Docker download the Docker windows installer and run, once installation is finished Docker will start automatically, you can check the whale icon in the notification area. I am running on Docker windows container.

Docker version

We are done with the installation. Now let's talks about 

Docker:- Docker is a tool that is designed to benefit both developers and system administrators, making it a part of many DevOps.

For developers, it means that they can focus on writing code without worrying about the system that it will ultimately be running on.

In a way, Docker is a bit like a virtual machine. But unlike a virtual machine, rather than creating a whole virtual operating system.

It is a tool designed to make it easier to create, deploy, and run applications by using containers. Containers allow a developer to package up an application with all of the parts it needs, such as libraries and other dependencies, and ship it all out as one package. 

SDL DXA-Theming module:- It is used to manage HTML-design create microsites with very minimum efforts.DXA is build using responsive design HTML5 and Bootstrap.It gives us the flexibility to change the design as per requirement.To know more about the DXA-theming please refer my previous blogs here.

Let's begin with creating our first Docker Image.


I already have DXA 1.7 available on my local machine you can download from official SDL GitHub account. Every application requires a specific working environment: pre-installed applications, dependencies, databases, everything in a specific version. Docker containers allow you to create such environments.

As a first step, we need to create DockerFile.

The Docker container is launched on the basis of a Docker image, a template with the application details. The Docker image is created with instructions written in the Dockerfile. Let's add Dockerfile to the directory with our application:

DockerFile


Line 1: Use another Docker image for the template of my image. We shall use the official Node.js image with Node v8.

Line 2: Set working dir in the container to /.design. We shall use this directory to store files, run npm, and launch our application:

Line 3-5: Copy application to /.design directory and install dependencies. If you add the package.json first and run npm install later, Docker won't have to install the dependencies again if you change the package.json file. This results from the way the Docker image is being built (layers and cache).

Line 6: This line describes what should be executed when the Docker image is launching.

Line 7: Expose port 9000 to the outside once the container has launched:

Build Docker Image


Docker comes with pre-defined sets of commands which we can run using powerShell (should be running in Admin mode).Run the docker build command, set the name of our image with -t parameter, and choose the directory with the Dockerfile.

docker build -t hemkant/dxa-theming .

Build Docker Image

Run the Docker Image

The DXA-Theming module has been saved as an image now we need to run the docker run command. Image name should be in lower case.

docker run -p 9000:9000 hemkant/dxa-theming
Run Docker Image

The application is ready to browse using http://localhost:9000 running in docker.

Browse-WhiteLabel HTML Design

Sharing Docker Image

Sharing is carrying. Docker images can be hosted and shared. The most popular are Docker Hub, a GitHub among Docker registries, in which you can host private and public images. Let's push an image to Docker Hub now:

  1. Sign-up at hub.docker.com.
  2. Run the following two commands
  3. docker build -t hemkant/dxa-theming
  4. docker push hemkant/dxa-theming
Upload image on docker hub.

Docker hub

Once your image is uploaded it's now available to re-use without any hassle by installing the Docker and run the below command easy and cool. You don't have to install Node, bower, NPM, and Grunt on your local machine to run DXA-theming module because everything is already shipped into Docker.

docker run hemkant/dxa-theming


Happy coding and keep sharing!!.

Tuesday 15 August 2017

How to customize DXA theme - Step 2 Edit HTML,update CMS and create HTML-design package

In my previous blog, we have launched the default HTML-Design which come up the DXA framework.Today we are going to make some changes in the design, will see how we can create the update HTML-Design package and finally CMS level changes and then publish those changes.

Modifying the design
As we know DXA framework build using Bootstrap, we can customize it by changing the standard Bootstrap variables in .\system\assets\less\_variables.less, and then rebuild with Grunt.

Let's make some changes. what I did is I have changed the default language selector Dropdown into Dropdown with filter functionality by modifying the design by changing the contents of the .\src\ folder.

Modified HTML

Next step is to create the package for updated HTML-Design and for that we need to run the following command:

grunt package

Create package

The html-design-{yyyy-mm-dd}.zip file in the .\zip\ folder is created. You can upload this .ZIP file in the CMS and republish the HTML design.

Package
Now, we need to update the raw assets for that we need to make changes in HTML design component and to access that navigate Building Blocks/Modules/Core/Admin Folder.Upload the latest and updated HTML-Design.zip there save and close the component and now we need to publish the Publish HTML Design page.

So, we finally updated the HTML-Design, created the package and upload in the CMS. Similarly we can change the branding of our site like change font, background color etc. to this we need to modify the HTML Design Configuration component navigate to the Building Blocks/Settings/Core/Site Manager/ Folder and here we can configure the HTML Design, Build Files, Version Number, Favicon, Bootstrap Configuration this will need to be done for each microsite that you want to style following the locale.

HTML Design Configuration 


Happy coding and keep sharing

Monday 14 August 2017

How to customize DXA theme - Step 1 Launch default HTML design

DXA is build using responsive design HTML5 and Bootstrap.It gives us the flexibility to change the design as per requirement.

Let's start with spinning the already existing HTML-design but before that, we need to install prerequisites.

  1. Install Node.js
  2. Instsll npm,grunt and bower.
    • npm install -g npm@3
    • npm install -g grunt-cli
    • npm install -g bower.
Install npm

Install Gurnt-cli
Install Bower


Once you have done with installations run below command to check node and npm version.

I already have the latest version of Node.js and npm install on my machine.Now let's build the assets we need to copy the content of .\html\desgin from the installation media to any location and run the 
  1. npm install
  2. brower install 
  3. grunt build
What this will do, this will build all the assets and can found in the ./dist folder.

Let's run the site locally and for that we need to run grunt command.
grunt serve

Grunt serve
A web server will be started at http://localhost:9000.

Whitelabel HTML Design
For next step on how to edit HTML, create HTML-Design package and update CMS.

Happy coding and keep sharing!!!                                                                                       


Monday 29 May 2017

Universal WorkList Alchemy Plugin for SDL WEB

Centralized way of Managing all the tasks Universal Work List is used to manage ,respond to ,assign daily task or delegate tasks to peers.With the help of this plugin you will able to manage all our task and communication from CMS.

Features of this plugin

  1. Create Task and assign to peers.
  2. Update Task status and put your comments.
  3. Re-assign task you any user.
  4. Assign any task to yourself.
  5. Dashboard.
  6. Powered by SOLR 6.5
Let's go through the each screens one by one and understand how its works and its functionality. 


Landing page where you will see all the task assign to you and you can filter them as well to render data I have used JSgrid which gives all the feature such as pagination,sorting etc.
Landing page
 Here, I will have all the task assign to me rendering and I can create the task ,by clicking on the uniqueKey it will take user to Task update page, where user can update comments and status
Update Task
Here user can update comments ,update task status,Re-assign to other user . All the data is stored in SOLR. 

Next ,is how to create a task.In the create task panel you have 
  1. Task assign to field.
  2. Watcher or you can say second look.
  3. Priority is defined.
  4. Environment 
  5. Issue description.   
    Create Task
Happy Coding and keep Sharing !!!

Monday 22 May 2017

Alchemy Chat Plugin For SDL WEB

This plugin is used to communicate with all CMS user as in group or one to one chat.I have used JQuery,WEB API and SOLR to store all the chat data.
By default it will load top 100 messages based on datetime in your chat window for both group and one to one chat,with the help of this plugin we can easily communicate with all CMS users without any problem,most of the time we face this problem when our client or editors are only accessible via emails not on chat.

To use this plugin we need to install SOLR
  1. Download SOLR here .I have used SOLR version 6.5
  2. Create core in SOLR
  3. Update managed-Schema.xml and add following fields.
  4. Re-Start :- solr start -p <portNumber>
  5. Chat Plugin will load all the CMS users using coreservice.
  6. In the group window your message will be visible to all CMS users.
  7. In One2One only the participates. 

<field name="id" type="string" indexed="true" stored="true" required="true" multiValued="false" />
<field name="Message" type="text_general" indexed="true" stored="true" required="false" multiValued="false" />
<field name="MessageId" type="string" indexed="true" stored="true" required="false" multiValued="false" />
<field name="User" type="text_general" indexed="true" stored="true" required="false" multiValued="false" />
<field name="TimeStamp" type="string" indexed="true" stored="true" required="false" multiValued="false" />
<field name="isPrivateChat" type="string" indexed="true" stored="true" required="false" multiValued="false" />
<field name="chatWith" type="string" indexed="true" stored="true" required="false" multiValued="false" />
<field name="privateChatID" type="string" indexed="true" stored="true" required="false" multiValued="true" />

Once all this is done install the plugin and start chatting with all the CMS users,or you can chat with any user one to one.
Install chat Plugin
Group chat with all CMS users.
Group chat data index in SOLR
One to one chat with CMS user.
One to One Chat
One to one chat data in SOLR

Happy Coding and keep sharing !!!!