Sunday, 4 December 2016

Salesƒorce Integration with SDL WEB8


Salesƒorce-CRM

A CRM system is a business tool that allows you to manage all your customers, partners, and prospects information all in one place. The Sales Cloud (Salesforce.com’s CRM system) is a cloud based CRM system.
For example, it helps:
1.       sales teams close deals faster
2.       marketing manage campaigns and track lead generation
3.       service call centres reduce the time to resolve customer complaints

SDL WEB 8-CMS

                SDL Web covers four main core functional areas:
1.       Web Content Management
2.       Experience Optimization (including personalization)
3.       Digital Media
4.       Localization

Steps to get the SF API and how to create .NET based client

1.       Go to ap2.salesforce.com and create your developer account.
2.       Click on Setup and from quick find search for API.
3.       Select the API, Salesforce’s WSDL allows you to easily integrate salesforce.com with your applications, and to build new applications that work with salesforce.com. To get started, download a WSDL file to a place accessible to your development environment. For complete documentation, sample code, and developer community, visit
5.       I used Enterprise WSDL 
a.       A strongly typed WSDL for customers who want to build an integration with their salesforce.com organization only.
SF API

Create dummy data in SF

Dummy data is created in SF
 I have created some dummy data in Lead object which we will accessing using Enterprise WSDL  API


Read Data using .NET Client and SF API

Add SF Enterprise API as service reference in your project 
    1. Login to the Force.com API
    2. Change the binding to the new endpoint
    3. Create a new session header object and set the session id to that returned by the login
    4. Queries are executed against the Force.com API using SOQL (Salesforce.com Object Query Language).


In the screenshot, we can see that the data created in SF is accessible using .Net client.

Write Data in SF using .Net Client

  1. Instantiate the Object Being Created: Before we can execute a create() against the API, we must establish the type of object being created. In this case, we will create a new lead.
  2. Establish Field Values and Object Properties
  3. Execute Create Call and Capture Save Results
  4. Working with the Results: The create call will obviously result in success or failure. Successful create calls will return the ID value of the resultant record created. Fortunately, the API is built to allow us to handle both scenarios within our application.
  5. Data is successfully created
  6. Let’s go and check in SF online. Here you can see the details which we have supplied via .NET client is saved in SF.

Let’s integrate SF with SDL WEB 8

    1. We already have SF API and before we start the integration of SF with SDL WEB 8 we need to first create WEB 8 Core service client to get the object.
    2. Core Service is WCF based webService.
    3. I have already created core service client using ISessionAwareCoreService.
    4. After this we need to read Component data using.
    5. Deserialize the data in to the object, and send to SF API to create the records in SF.
    6. Know we have the components List from WEB 8 , run SF API create method to create new records in SF.
    7. I have created sample component in WEB 8 which is pushed in to SF
      • Below image is CMS component which is pushed to SF.
      • Salesforce UI here we can see the data which was pushed from WEB 8 is successfully created in SF.
      • So, we are successfully able to push content from WEB 8 to SF lets work on the other way around so that we can say SF and WEB 8 are in sync.
    8. To create content in WEB 8 
      • Need core service client I have re-used the same core service utility.
      • Folder Location where you want to create content.
      • Read data from SF you can check Read data from SF section for more information
      • Transform the object into XML.
      • We need to call coreService create method.
Run this service in background as Windows service or Task Scheduler  to keep Salesƒorce and Tridion in a sync also if you want to have, create custom Salesƒorce objects, and add custom fields you can also do that, in this demo I have used the default object LEAD provided by Salesƒorce.

Prerequisites to create custom objects in SF:

A Salesƒorce account in a sandbox Professional, Enterprise, Performance, or Unlimited Edition org, or an account in a Developer org.


Happy  Coding and keep Sharing !!

Sunday, 27 November 2016

Cms Talk to Cms

The Value of website content


Content is what sets your website apart from the masses.The success of your website is determined primarily by its content .
The key to a successful website is having managed,relevant,clear and keyword-rich content . 

Why content is important ?

  1. It makes your brand an authority 
    • Quality content delivered on a regular basis makes your brand an authority
  2. You get to know your customers
    • Content ,when delivered through websites,social media allow for feedback.It means you can gauge your customers.
  3. Generating content improve SEO
    • Managed,relevant and keyword-rich content is very important for SEO.
  4. Content add value 

Today we are going to see how we can manage,share our content between multiple CMS. The whole idea here is how we can share the content across multiple CMS.
ArchitectureDiagram
High-Level Architecture diagram of CmsTalkToCms
Let's discuss the diagram
  1. Point A
    1. Here I have created a C# console based application which takes inputs from user and forward that request to business connector 
    2. Inputs are like
      • Read data from CMS A process it in a manner which is accepted by CMS B.
      • Mentioned the type of the data (In case of Tridion schema and for Umbraco parent document type)
      • Returns the count and details of the transaction.
      • User authentication is done at this level.
  2. Point B
    1. Business connector is the core of this architecture.
      1. It will consume all the input provide by the Client
      2. Based on that it will first call the source CMS could be point (C) or (D) .
        • Here we extract all the items which needs to share.
        • Transform the data in a manner which is accepted by the destination CMS
        • Once data transformation is done then we will call the destination CMS service which could be point (C) or (D).
        • Service will validate the data 
        • Finally data is pushed to destination CMS.
      3. Destination service
        1. Will also validate the data before performing CRUD operation
        2. Service will check if any item in the list send by the source already exist
        3. If yes will run update else create new item.
    2. After all the data is either updated created or rejected the response will be send back to the business connector and business connector share that response with the client Point A.
  3. Point C
    1. I have created Custom web service .ASMX 
    2. Using Umbraco.core DLL provided by Umbraco.
    3. Using this DLL we can perform all the CRUD operations. 
      service
      Point (C) Content Service used for CRUD operations 
  4. Point D
    1. Tridion core service is used for CRUD operations.
    2. ISessionAwareCoreService is used to create the core service client. 

Sunday, 30 October 2016

News and Article Module In DXA

Why Fresh Content is Critical for Your Website?
  1. Keep Your Audience Informed and Updated
  2. Fresh Content Increases Your Authority Potential
  3. More Content, More Keywords
  4. Google Loves Frequent Updates
So, add an article, an image or just make some change on your site to get noticed. The easiest and most effective way to stay fresh is to add a blog on your site and continue to add articles that will get noticed by your viewers.

Today,We are going to discuss and create News and Article module in DXA which will have following features  .DXA Modules allows us to extend its Functionality via creating new modules. Here we can create new modules which gives us flexibility & re-usability.
  1. Article searching
  2. Tag based filtering 
  3. Article list and detail articles 
  4. Author details page 
Let's discuss the CMS part first.
CMS structure
  1. Define module's folder structure
  2. DXA gives us predefined structure where we can putting all the building blocks of the module.
  3. For each new DXA module, we need to create a new folder in Modules Folder
  4. The name of folder is usually module name.
Next is creating the Schema and Component Templates. I have used dynamic components which render on the landing page as a list of articles and with details page link.

You need to create dynamic CT for the list of articles

Dynamic Component Template
Publish all the Dynamic Article components .
Dynamic N&M Components

To read dynamic Components we need to query Broker DB.
Get Article Dynamic Components ID

Build Criteria based on you will get the data from Broker DB
Now ,Let's see the Content Delivery 
New Area called NewsAndArticle in DXA 
Create new area in you DXA web Application. Here i have created Models,and helper class to get the data from broker using Broker Queries.

Register your views in NewsAndArticleAreaRegistration.cs . Once done now let run the application .

1. News and Article Landing Page
Landing Page
Here you can see list of articles are rendering from Broker DB using broker query .Using this view we can search an article ,filter by category and view the author details.

2. Search will search in the intro Text in metadata.
Search result
3. Filter your result based on Tags click on tag.
Result based on tags

4. Click on read more link for Article Details page 
Article details page
5. Author Details Page .
Author page

Happy coding and keep sharing !!!!

Saturday, 8 October 2016

FormBuilder Module in DXA Content Delivery Settings

My First DXA Module - Form builder Step by Step  cont'd


In Previous post, we have discussed on the CMS Part of the DXA module. now lets discuss the CDA part

Step 1. Download the DXA framework Here
Step 2. I have created new area called FormBuilder 


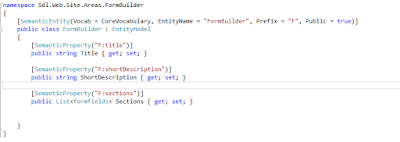
Step 3. Create a ViewModel based on FormBuilder Schema

Step 4. Lets create Login.CHTML View which will consume the FormBuilder ViewModel and render the userControl based on the formFields attached to it.


Last Step is to update the form FormBuilderAreaRegistration.cs


Build and run the solution .In below screen shot you can see the form is rendering.

We have completed the Formbuilder Module this is a very basic Formbuilder soon i will be adding more functionality like custom error message and data save/authentication functionality .

Happy Coding and Keep Sharing !!!! 

FormBuilder Module in DXA

My First DXA Module - Form builder Step by Step

In this we will discuss how to setup CMS to create your own DXA module

  1. In this Post we will discuss how to setup DXA module in CMS
  2. Next, we will be discussing CD level setting 

  1. First we will define the folder structure 
  2. Create a new folder in the Modules folder
  3. Rename that folder to FormBuilder
  4. Create Admin ,Site Manager and Editor
Let's create FormBuilder Schemas

      Form field Schema: - Is used to create the controls such as text box, radio button etc.

  •     Here i have field type ,field name and label text
  •     You can create field Type as category,Keywords to list down all the possible controls

Form Builder Schema: - Is used to give the title, Description and here we also linked all our components 
which was created using Schema Form Field.
  •     In This component we will linked all are component created using Form Field  Schema which contains all the different types of fields type Components “First Name, Last Name”.
  •           Insert this component as component presentation in your page .

This schema will be used by Editor to define the FormBuilder components with 
       required details and attached to page.
     
      Component Template:I have created a new CT (FormBuilder) to be attached with component of above schema 


      Next Step is to configure the DXA and create new area called FormBuilder Here

     Happy Coding and Keep Sharing !!!!

Monday, 30 May 2016

Exchange Integration 4 Tridion-Ei4T

Introduction 

Exchange Integration 4 Tridion-Ei4T is intent to provide the Tridion integration with Microsoft Exchange server to read emails and create components in SDL Tridion.


Ei4T-High Level Architecture
SETUP

Below are various set-up step and prerequisites 
  1. Dedicated Email-Id is required on which service will keep on checking for emails
  2. Task scheduler to schedule the service.
  3. Custom validator will get EWS url.
  4. Task scheduler and Exchange Service SearchFilter ItemSchema.DateTimeReceived time Interval
    should be in sync 
  5. Make sure you select right version of Exchange.I am using ExchangeVersion.Exchange2013 
  6. Publish component only if its marked as item.Importance == "High" again this is configurable
  7. Create Tridion coreService client using ISessionAwareCoreService
  8. Create model as Serializable
  9. Copy the configuration folder/logging.config file and update the path in app.config
  10. Update App.Config 
    1. coreService Url
    2. Exchange Dedicated Email-ID/Password
    3. Schema ID
    4. Folder ID
    5. Publication Target ID
    6. CM userid/password to run coreService
  11. Email format


You can Download the code from here.

Happy Coding and Keep Sharing !!!

Monday, 23 May 2016

MongoDB Integration 4 Tridion-Mi4T

Introduction

MongoDB Integration 4 Tridion-Mi4T is intent to provide the Tridion integration with MongoDB

Let's see some of the features advantages of using MongoDB

Advantages
  1. Schema less : MongoDB is document database in which one collection holds different different documents. Number of fields, content and size of the document can be differ from one document to another.
  2. Structure of a single object is clear
  3. Deep query-ability. MongoDB supports dynamic queries on documents using a document-based query language
Why should use MongoDB
  1. Document Oriented Storage : Data is stored in the form of JSON style documents
  2. Index on any attribute
  3. Replication & High Availability
  4. Rich Queries
Where should use MongoDB?
  1. Big Data
  2. Content Management and Delivery
  3. Mobile and Social Infrastructure
  4. User Data Management

How to Set-up and Configure Mi4T

We have five different modules in the Mi4T
  1. MongoDB - Setup and configuration
  2. Template Bulding Block:- C# TBB is used to get the component DCP in XMLformat after some changes . 
  3. Custom Storage Extension – A JPAComponentPresentationDAO based custom storage extension to manipulate the dynamic component presentations
  4. MongoDBIndexService- WCFRestFul Service which get invoked by custom storage extension and take DCP as input
  5. MongoDBSearchService - WCFRestFul service to get the data from MongoDB and take input query in JSON format .

SETUP

Below are various setup steps
  1. CMS Setup
    • Copy and paste the templating building block (TBB) to a location on your Tridion CM Server 
    • Upload MI4TIndexing.Templating.dll TBB to Tridion CMS 
    • Create a Component Template with following attributes
      • Output Format – XML Fragment
      • Add GetComponentAsXML TBB ,Publish Binaries in Package, Link Resolver and Cleanup Template 
  2. MongoDB Setup
  3. Content Delivery Setup
    • Open the cd_storage_config.xml Storage Configuration file from the /bin/config folder and add following node under the Storages section:
      • <StorageBindings><Bundle src="CustomStorageDAOBundles.xml"/></StorageBindings>
    • Copy and paste CustomStorageConfig.xml file to change the value of following nodes
      • ServiceEndPoint - URL of the IndexService
      • TemplateIdToIndex - Tcm Id Of component Template which we have created in step 1 CMS setup. 
    • Copy the CustomStorageDAOBundles.xml XML file in the Content Delivery /bin/config folder
  4. MongoDB Index Service
    • Copy and paste MongoDBIndexService on your server host it in IIS 
    • Copy the configuration folder as well .
      • You can update the log files path from Logging.config inside the configuration folder
    • Update the path of configuration\logging.config file in web.config of index service
  5. MongoDB Search Service
    • Copy and paste MongoDBIndexService on your server host it in IIS 
    • Copy the configuration folder as well 
      • Update the log files path in Logging.config inside the configuration folder
    • Update the path of configuration\logging.config file in web.config of index service
  6. Index service support Publishing ,Re-publishing and un-publishing
  7. Search service will get the data in JSON format. 

To test the index and search services

  1. Index service

    1. You can use fiddler for debugging 
    2. I have created a sample schema article
      1. title
      2. description
      3. imageurl
    3. Run index service on fiddler
      • http://localhost/Service1.svc/AddDocument
      • Input JSON which will generated by custom storage 
      • {"ServicePayload":{"DCP":"<Content xmlns:xsi='http://www.w3.org/2001/XMLSchema-instance' xmlns:xsd='http://www.w3.org/2001/XMLSchema' xmlns:xlink='http://www.w3.org/1999/xlink' xmlns:tcm='http://www.tridion.com/ContentManager/5.0' Title='Copy of Demo Of MongoDB' Id='tcm:2073-13667'><title>Demo Of MongoDB</title><description><![CDATA[Demo of component creation in Tridion using MongoDB]]></description><imageurl>/images/demo.png</imageurl><publication Id='tcm:0-2073-1' Title='03 Content Master' /></Content>","LanguageInRequest":"en"}} 
    4. Execute this request in Fidler and verify the results returned
    5. Check in mongoDB as well inside the collection\document which you have created and entered in the index service 
    6. Result as 0 for success and 1 for failure
      •  {"ResponseContext":{"EnvironmentContext":null,"FaultCollection":[]},"ServicePayload":{"ErrorMessage":"","Result":0}}
    7. Test this by publishing the Component as well 
    8. Log File Where Response Result :0 means successfully published and data is index in MongoDB
  1. Search Service
    1. You use the fiddler for debugging 
    2. Run the search service on fiddler
      • Url:- http://localhost/SearchSvc.svc/GetContentFromMongoDB
      • {"ServicePayload":{"ContentType":"Content","Filters":[{"Key":"ItemURI","Value":"tcm:2073-13667"},{"Key":"publicationID","Value":"tcm:0-2073-1"}]}
      • Execute the request in fiddler and verify the results returned
      • This service will get you the result based on Filters you provide and  use //MAP/REDUCE  
      •  //Map/Reduce            
                            var map =
                                "function() {" +
                                "    for (var key in this) {" +
                                "        emit(key, { count : 1 });" +
                                "    }" +
                                "}";

                            var reduce =
                                "function(key, emits) {" +
                                "    total = 0;" +
                                "    for (var i in emits) {" +
                                "        total += emits[i].count;" +
                                "    }" +
                                "    return { count : total };" +
                                "}";
      • Output will be in the JSON format 
      • { "_id" : ObjectId("5741539eef525465db9eb131"), "title" : "Demo Of MongoDB", "description" : "Demo of component creation in Tridion using MongoDB", "imageUrl" : "/images/demo.png", "ItemURI" : 
      •  
      • "tcm:2073-13667", "publicationID" : "tcm:0-2073-1" }
      • You can have AND,OR and NOT as a logical operators to query the data from MongoDB
        • {"ServicePayload":{"ContentType":"Content","Filters":[{"Key":"ItemURI","Value":"tcm:278-13667"},{"Key":"publicationID","Value":"tcm:0-278-1"}],"MongoDatabase":"customerDatabase","Table":"article","QueryType":"OR"}
  2. You can download the code here

Happy Coding & Keep Sharing !!!