Showing posts with label api. Show all posts

Friday, 20 January 2023

Spring Boot Security module best practice

Spring Boot Security is a module of the Spring Framework that provides a set of features for securing Spring-based applications. It is built on top of Spring Security, which is a powerful and highly customizable authentication and access-control framework. 


Spring Boot Security provides several features out of the box, including: 

Authentication: Spring Boot Security supports several authentication mechanisms, including basic authentication, token-based authentication (JWT), and OAuth2/OpenID Connect. 

Authorization: Spring Boot Security supports role-based access control (RBAC) and can be configured to check for specific roles or permissions before allowing access to an endpoint. 

CSRF protection: Spring Boot Security provides built-in protection against cross-site request forgery (CSRF) attacks. 

Encryption: Spring Boot Security supports HTTPS and can be configured to encrypt all traffic to and from the application. 

Security Configuration: Spring Boot Security allows to secure the application by providing a set of security configuration properties that can be easily integrated into different security scenarios. 

It also provides support for the integration of Spring Security with other Spring modules such as Spring MVC, Spring Data, and Spring Cloud.

Securing a Spring Boot API is important for several reasons: 

  • Confidentiality: By securing an API, you can prevent unauthorized access to sensitive data and protect against data breaches. 
  • Integrity: Securing an API can prevent unauthorized changes to data and ensure that data is not tampered with in transit. 
  • Authentication: By securing an API, you can ensure that only authorized users can access the API and perform specific actions. 
  • Authorization: Securing an API can also ensure that users can only access the resources and perform the actions that they are authorized to do. 
  • Compliance: Many industries and governments have regulations that mandate certain security measures for handling sensitive data. Failing to secure an API can result in non-compliance and penalties. 
  • Reputation: Security breaches can lead to loss of trust and damage to an organization's reputation. 
  • Business continuity: Security breaches can lead to loss of revenue, legal action, and other negative consequences. Securing an API can help to minimize the risk of a security breach and ensure business continuity.

There are several ways to secure a Spring Boot API, including: 

  • Basic authentication: This method involves sending a username and password with each request to the API. Spring Security can be used to implement basic authentication. 
  • Token-based authentication: This method involves sending a token with each request to the API. The token can be generated by the server and passed to the client, or the client can obtain the token from a third-party service. JSON Web Tokens (JWT) are a popular choice for token-based authentication in Spring Boot. 
  • OAuth2 and OpenID Connect: These are industry-standard protocols for authentication and authorization. Spring Security can be used to implement OAuth2 and OpenID Connect. 
  • HTTPS: All data sent to and from the API should be encrypted using HTTPS to protect against eavesdropping. Input validation: 
  • Input validation should be used to prevent malicious data from being passed to the API. Spring Boot provides built-in support for input validation. 
  • Regularly monitoring and maintaining the security of the application and its dependencies It's important to note that the best approach will depend on the requirements of your specific application and the level of security that is needed.
Token-based authentication is one of the most commonly used methods to secure Spring Boot API. The reason token-based authentication is so popular is that it provides several advantages over other authentication methods: 
  • Stateless: Tokens are self-contained and do not require the server to maintain a session, which makes it easy to scale the API horizontally. 
  • Decoupled: Tokens are decoupled from the API, which means that the API does not need to know anything about the user. This makes it easy to add or remove authentication providers without affecting the API. 
  • Portable: Tokens can be passed between different systems, which makes it easy to authenticate users across different platforms. 
  • JSON Web Tokens (JWT) which is a widely used token format, is an open standard and can be easily integrated into different systems. 
  • It can also be used in combination with OAuth2 and OpenID Connect. 
It's important to note that token-based authentication is not suitable for all use cases, but it is widely used and can be a good choice for many Spring Boot API.

Happy Coding and Keep Sharing!!

Tuesday, 18 October 2022

Microservice Architecture in Java

Microservice Architecture enables large teams to build scalable applications that are composed of multiple small loosely coupled services. In Microservice each service handles a dedicated function inside a large-scale application.

Challenges that we all see when designing Microservice Architecture are "Right-Sizing and Identifying the limitations and Boundaries of the Services".

Some of the most commonly used approaches in the industry:-

  • Domain Driven:- In this approach, we would need good Domain Knowledge and it takes a lot of time to close alignment with all the Business stakeholders to identify the need and requirements to develop Microservices for business capabilities.  
  • Event Storming Sizing:-  We conduct a session with all business Stakeholders and identify various events in the system and based on that we can group them in Domain Driven.

In the below Microservice Architecture for a Bank, where we have (Loan, Card, Account, and Customer) Microservices, along with other required services for the successful implementation of Microservice Architecture. 


Let's look at the most critical components that are required for Microservice Architecture Implementation. 

The API Gateway handles all incoming requests and routes to the relevant microservices.  The API gateway depends on the Identity Provider service to handle the authentication.

To locate the service to route an incoming request to, API Gateway consults a service registry and discovery service. ALL Microservice register with Service Registry and Discover the location of other Microservices using Discovery services. 

Let's take a look at the components in detail for a Successful Microservice Architecture and why they are required.
  1. Handle Routing Requirements API Gateway:- Spring Cloud Gateway is a library for building an API gateway. Spring cloud gateway sits between a requester and a resource, where it intercepts analysis of the request.  It is also a preferred API gateway from the spring cloud team.  It also has the following advantages:- 
    1. Built on Spring 5, reactor, and Spring WebFlux.
    2. It also includes circuit breaking and discovery service with Eureka.  
  2. Configuration Service:-  We can't Hard code the config details inside the service and in a DTAP it would be a nightmare to manage all config in the application properties plus manage them when a new service joins. So for that In a Microservice architecture, we have a config service that then can load and inject the configuration from (Git Repo, File system, or Database) to Microsrevies while they're starting up, and since we are talking about Java, I have used Spring Cloud Config for Configuration Management.
  3. Service Registry and Discovery:- In a Microservice Arihcture how do services locate each other inside a network and how do we tell our application architecture when a new service is onboarded or a new node is added for existing services and how load balancer will work. This all looks very complicated but, We have Spring Cloud Discovery Service using the Eureka agent. Some Advantages of using Service discovery. 
    1. No Limitation on Availability 
    2. Peer to Peer communication between service Discovery agent
    3. Dynamically Managed IPs, Configurations, and Load Balance.
    4. Fault-tolerance and Resilience 
  4. Resilience Inside Microservices:- In this, We make sure that we handle the service failure gracefully, avoid cascading effects if one of the services is failed, and have self-healing capabilities. For Resilience Spring Framework Support Resilience4J  which is a lightweight and easy-to-use fault tolerance library inspired by NetFlix Hystrix. Before Resilience4J NetFlix Hystrix.is most commonly used for resiliency but it is now in maintenance mode.  Resilience4J offers the following patterns for increasing fault tolerance. 
    1. Circuit Breaking:- Used to stop making a request when a service is failing.
    2. Fallback:- Alternative path to failing service.
    3. Retry:- Retry when a service is failing temporarily failed.
    4. Rate Limit:- Limit the number of calls a service gets at a time.
    5. Bulkhead:- To avoid overloading.
  5. Distributed Tracing and logging:- For debugging the problem in a microservice architecture we would need to aggregate all the logs traces and monitor the chain of service calls for that we have Spring Cloud Sleuth and Zipkin.
    1. Sleuth provides auto-configuration for disturbing logs it also adds the SPAN ID to all the logs by filtering and interacting with other spring components and generating the Correlation Id passes through to all the system calls.
    2. Zipkin:- Is used for Data-Visualisations 
  6.  Monitoring:- Is used to monitor service metrics health checks and create alerts based on Monitoring and we have different approaches to do that. Let's see the most commonly used approaches.
    1.  Actuator:- is mainly used to expose operational information like health, dump, info, and memory.
    2. Micrometer:- Expose Actuator data in a format that can be understood by the Monitoring system all we need to add vendor-specific Micrometer dependency in the service.
    3. Prometheus:- It is a time-series database to store metric data and also has the data-visualization capability.
    4. Grafana:-  Pulled the data from various data sources like Prometheus and offers rich UI to create custom Dashboard and also allows to set rule-based alerts and notifications. 

We have covered all the relevant components for a successful Microservice Architecture, I build  Microservices using  Spring Framework and all the above Components Code Repo

Happy Coding and Keep Sharing!!
 

Tuesday, 11 October 2022

SpringBoot API with GitHub Actions, Docker Deployment

Today, We are going to explore and see other possibilities of the most important aspect of SDLC, Which is Continues Integration & Continues Deployment aka CI/CD. There are many tools (Jenkins, Bamboo, etc) available in the market which we can use to Build, Test and Deploy the changes on servers.


In the above diagram, the entire CI/CD is taken care of by Jenkins which is a 3rd party tool. In the real world, this required additional resources (infrastructure) and a team to manage this.

So, since We are using GitHub is there a way we can reduce this additional stuff. Yes, we can use GitHub Actions where the entire CI/CD will run on the same platform. We all have seen this option in GitHub but very rarely do we go there.


To understand it better, let's build a sample Spring Boot application --> Push the code in GitHub -->Trigger Github Actions --> Docker hub.

First, we need to create a repository in GitHub and then go to the Actions tab and click new Workflow options, here we will get many workflow options that we want to integrate with our application, but for this demo, we need to select " Java with Maven".


After you click on configure it will create a maven.yml file which you need to merge with your code, but before that, we need to update the yml to support our application build.


and yes that's it so whenever we merge the code in the master branch the GitHub Actions workflow will trigger and build the code, but we want is that after building the code the, latest changes should also deploy to the Container Registry I am using Docker here, but you can use any other.

In order to push the changes to the docker, we first need to create a repository in the docker hub and after that, we need to tell our maven.yml file about this new step.  

 # This workflow will build a Java project with Maven, and cache/restore any dependencies to improve the workflow execution time  
 # For more information see: https://help.github.com/actions/language-and-framework-guides/building-and-testing-java-with-maven  
 name: Java CI with Maven  
 on:  
  push:  
   branches: [ "master" ]  
  pull_request:  
   branches: [ "master" ]  
 jobs:  
  build:  
   runs-on: ubuntu-latest  
   steps:  
   - uses: actions/checkout@v3  
   - name: Set up JDK 17  
    uses: actions/setup-java@v3  
    with:  
     java-version: '17'  
     distribution: 'temurin'  
     cache: maven  
   - name: Build with Maven  
    run: mvn clean install  
   - name: Build & Push Docker Image  
    uses: mr-smithers-excellent/docker-build-push@v5  
    with:  
     image: hemkant/github-actions  
     tags: latest  
     registry: docker.io  
     dockerfile: Dockerfile  
     username: ${{ secrets.DOCKER_USERNAME}}  
     password: ${{ secrets.DOCKER_PASSWORD}}  
I have used another image here which will perform all the operations docker-build-push. after that, the credentials to access the docker hub is stored in GitHub secrets.


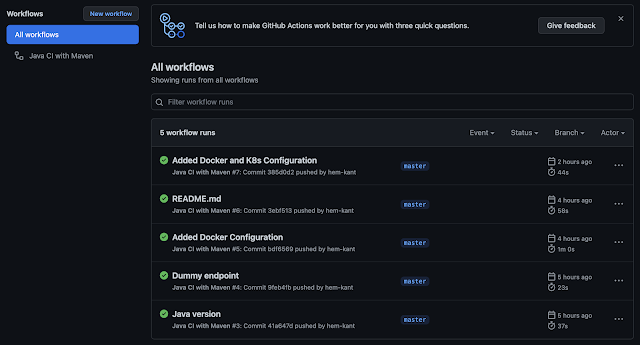
After all of these let's commit some code and see, how all these work together. In the below screenshot, we can see all the workflow triggers whenever I committed the code.


and let's also see if the steps we mentioned in our maven.yml file are followed or not, for that we can click on any item to check and it will show us all the details.


 And the docker file which I used here is 
 FROM openjdk:17  
 EXPOSE 8080  
 ADD target/github-actions.jar github-actions.jar  
 ENTRYPOINT ["java", "-jar", "/github-actions.jar"]  

let's check the Build & Push Docker Image step. looks like everything is fine here, and image is pushed to Docker Hub

The last thing we should also check is Docker Hub, looks good the image is pushed successfully.


We have covered all the points which we discussed at the beginning of this blog. Code Repo.

In the next blog, We will deploy the same image on the Google Cloud Platform, Kubernetes. 

Happy Coding and Keep Sharing!!

Sunday, 9 October 2022

Spring Boot API with MongoDB Atlas

In this blog, We are going to explore and learn the Spring Boot application with MongoDB Atlas. For that, we need to first need to create an account at https://cloud.mongodb.com, and configure some default settings in order to spin a new free cluster. We also get the option to select the cloud provider and region.


after creating the cluster and configuring credentials, we are all set as you can see I have created a new cluster in the AWS cloud, and the Collection is called "task" and it is a shared one so free no charges will apply. 


Next, let's initialize the Spring Boot application for that, we can go to https://start.spring.io/  or if you have a Spring Boot plugin in your IDE you can use that as well.


In the Spring initializer, I have added four dependencies. 
  1. Spring Web:- For building RESTful APIs.
  2. Spring Data MongoDB: -  It is a part of the Spring Data project, which provides integration with the MongoDB document database.
  3. Spring Boot Actuator:- it is a sub-project of Spring Boot and is used for monitoring purposes.
  4. Lombok:- For Java annotations. 
After this, We can generate the code and open it in your favorite IDE. I have written code for CRUD operations to test the API with MongoDB Atlas.

Let's see 1-2 examples.
  • Create some content in MongoDB Atlast using Spring Boot API:

  • Let's invoke the GET by ID endpoint

  • GET ALL endpoint

  • Rest of the operations you can check in the code but one more thing I wanted to show here is how the data is stored in the MongoDB Atlas, for that we can go to the cluster and click on Browse Collection 

There are other things that we can explore such as Realtime Monitoring, Enabling Data API which is available in MongoDB Atlas.


 That's it in this blog. Code Repo.


Happy Coding and Keep Sharing!!

Wednesday, 29 September 2021

Event Driven Architecture using Apache Kafka

A quick recap of what we discussed in the previous post about the EDA, and In this post, we will see more insight. EDA It is a pattern that uses events to communicate between decoupled components or services, and these events will need to be published to an event broker platform and then sent to the consuming applications.  

Event-Driven Architecture is comprised of three components.

  • Producers:- are the apps or services that publish the events to an event broker platform.
  • Router:- Routes them to their respective consuming applications 
  • Consumers:- Another app or service that consumes a particular topic in an event router.
When Designing the Event-Driven Models we can implement two Models.

  • Pub/Sub (Publish/Subscribe):- Events are published to a topic and sent to one or more subscribers, once received, the event cannot be backtracked or reread again, and new subscribers do not see the event.
  • Event Streaming:- Events are written to a log and ordered in a partition. A client app can read from any part of the stream and reply to the events.

We are going to use Apache Kafka, to implement the event-driven architecture, which is an open-source, distributed, event streaming platform. 

Using Apache Kafka we could have multiple apps or services that write event events to Kafka cluster and at the same time, we could also have multiple consumers apps that subscribe or stream events from Kafka, Where a Kafka Cluster is a collection of brokers and they could be actual physical servers or single rack and If you are using Kafka on the cloud or as (PaaS) then you don't have to concerned about it. 

Here, Zookeeper is the one who is responsible for the cluster & Failure management and decides which among the replicated brokers can be the new leader.   

The broker can store multiple topics where producers write events, where a topic is a collection of related events or messages. When producers produce an event we need to specify the topic where we want to write or publish it.


In the next post, we will build Spring Boot API, which will produce events and we will see end to end flow of producers, routers and consumers using that, until then.

Happy coding and keep sharing!!
 

Monday, 27 September 2021

An Overview :- What is Event-Driven Architecture ?

Before, We jump into the EDA, let's understand the standard guidelines for system design or generally reactive manifesto. Which is something is community driven guidelines that are indented to give cohesive approach to system.     

So, the core of the reactive manifesto is make system message driven, more specifically "async" messaging.  


We want to make the system async messaging driven with scalabilityresilient and this helps us to build distributed systems or K8s. Where Scalable means our hardware should expand as the workload expands and By resilient we don't want any single point of failure and if it does we should be able to handle it elegantly.

Based on the above three foundations, we should be able to build a system that is responsive.   

Now, we have our core setup let's understand What is an event ?. In simple words, an event is a statement of facts that happened in the past. Let's talk about an example of a Retail application.


So, In an application, we have a checkout service and that service wants to talks to other services such as "Inventory", "Shipping", "Contact".

In the messaging model, if the inventory wants to know what the checkout is doing, the checkout will send a message directly to inventory to let it know a checkout happens. and to others as well directly to Shipping and to Contact service OR these services can message directly to checkout as well "Conversational Messaging", till now the message is sitting on a host machine.

When we design the event application our event producer might web app, mobile app, etc.. this will enable the events logs being produced by all the producing applications. 

Event logs can be used to Trigger an action In the case of IoT when any device turns on, It spins a pod on the Infra and that pod is a function as a Service (FaaS) that sits on top of Serverless Infrastructure and turns down when our function finishes by sending the event.  

With event logs we can optimize and custom data persistence, so can be possible that our Inventory service will consume data from stream send by web application m it will modify the local data and produce in the event backbone and this new stream is giving the most correct inventory data to any other application in the system.

Important things which happen here is we can save all our data raw or transformed in a Data Lake, this will help heavy application like AI.

Another thing that EDA enables is stream processing which is built on top of the Apache Kafka streams API.  

Benefits of Event/Driven Architecture
  • Asynchronous
  • Scalable and Failure Independent
  • Auditing and Point-in-time recovery 

Till now we have seen an overview and benefits of EDA that sit on top of reactive manifesto ideas for system designing.

In the next post, we will learn more about this in detail with some demo examples, Until then 

Happy coding and keep sharing!!