Wednesday, 19 October 2022

Best Time to Buy and Sell Stock with Cooldown

Problem Statement:- You are given an array of prices where prices[i] is the price of a given stock on the ith day.

Find the maximum profit you can achieve. You may complete as many transactions as you like (i.e., buy one and sell one share of the stock multiple times) with the following restrictions:

  • After you sell your stock, you cannot buy stock on the next day (i.e., cooldown one day).

Note: You may not engage in multiple transactions simultaneously (i.e., you must sell the stock before you buy again).

 Example 1:  
 Input: prices = [1,2,3,0,2]  
 Output: 3  
 Explanation: transactions = [buy, sell, cooldown, buy, sell]  
 Example 2:  
 Input: prices = [1]  
 Output: 0  

In example 1:- We have an array of prices and transactions, before we move forward let's go back and see the main restrictions we have here. We can't buy a stock or sell it the next day, we have to have at least one day gap (Cooldown day).

Now let's go back to the example, where we buy for 1 and sell for 2, which means the profit of 1, and then we have a cooldown period and then we buy for 0 and then sell for 2 which means the profit of 2.

So the total output is 3 and let's see how we can solve this problem with linear time O(n).


The downside of this approach would be Time Complexity = height of the tree n, where n is the size of the prices array, and the number of decisions we can make at every step is 2 so the overall time complexity would be (2n)

Using a Dynamic programming technique called caching we can reduce the time complexity by O(n)

 State: Buying and selling  
 if buying => i+1  
 if selling => i+2 (remember we need to wait for the cooldown day so i+2)  


Happy Coding and Keep Sharing !!   Code Repo

Tuesday, 18 October 2022

Microservice Architecture in Java

Microservice Architecture enables large teams to build scalable applications that are composed of multiple small loosely coupled services. In Microservice each service handles a dedicated function inside a large-scale application.

Challenges that we all see when designing Microservice Architecture are "Right-Sizing and Identifying the limitations and Boundaries of the Services".

Some of the most commonly used approaches in the industry:-

  • Domain Driven:- In this approach, we would need good Domain Knowledge and it takes a lot of time to close alignment with all the Business stakeholders to identify the need and requirements to develop Microservices for business capabilities.  
  • Event Storming Sizing:-  We conduct a session with all business Stakeholders and identify various events in the system and based on that we can group them in Domain Driven.

In the below Microservice Architecture for a Bank, where we have (Loan, Card, Account, and Customer) Microservices, along with other required services for the successful implementation of Microservice Architecture. 


Let's look at the most critical components that are required for Microservice Architecture Implementation. 

The API Gateway handles all incoming requests and routes to the relevant microservices.  The API gateway depends on the Identity Provider service to handle the authentication.

To locate the service to route an incoming request to, API Gateway consults a service registry and discovery service. ALL Microservice register with Service Registry and Discover the location of other Microservices using Discovery services. 

Let's take a look at the components in detail for a Successful Microservice Architecture and why they are required.
  1. Handle Routing Requirements API Gateway:- Spring Cloud Gateway is a library for building an API gateway. Spring cloud gateway sits between a requester and a resource, where it intercepts analysis of the request.  It is also a preferred API gateway from the spring cloud team.  It also has the following advantages:- 
    1. Built on Spring 5, reactor, and Spring WebFlux.
    2. It also includes circuit breaking and discovery service with Eureka.  
  2. Configuration Service:-  We can't Hard code the config details inside the service and in a DTAP it would be a nightmare to manage all config in the application properties plus manage them when a new service joins. So for that In a Microservice architecture, we have a config service that then can load and inject the configuration from (Git Repo, File system, or Database) to Microsrevies while they're starting up, and since we are talking about Java, I have used Spring Cloud Config for Configuration Management.
  3. Service Registry and Discovery:- In a Microservice Arihcture how do services locate each other inside a network and how do we tell our application architecture when a new service is onboarded or a new node is added for existing services and how load balancer will work. This all looks very complicated but, We have Spring Cloud Discovery Service using the Eureka agent. Some Advantages of using Service discovery. 
    1. No Limitation on Availability 
    2. Peer to Peer communication between service Discovery agent
    3. Dynamically Managed IPs, Configurations, and Load Balance.
    4. Fault-tolerance and Resilience 
  4. Resilience Inside Microservices:- In this, We make sure that we handle the service failure gracefully, avoid cascading effects if one of the services is failed, and have self-healing capabilities. For Resilience Spring Framework Support Resilience4J  which is a lightweight and easy-to-use fault tolerance library inspired by NetFlix Hystrix. Before Resilience4J NetFlix Hystrix.is most commonly used for resiliency but it is now in maintenance mode.  Resilience4J offers the following patterns for increasing fault tolerance. 
    1. Circuit Breaking:- Used to stop making a request when a service is failing.
    2. Fallback:- Alternative path to failing service.
    3. Retry:- Retry when a service is failing temporarily failed.
    4. Rate Limit:- Limit the number of calls a service gets at a time.
    5. Bulkhead:- To avoid overloading.
  5. Distributed Tracing and logging:- For debugging the problem in a microservice architecture we would need to aggregate all the logs traces and monitor the chain of service calls for that we have Spring Cloud Sleuth and Zipkin.
    1. Sleuth provides auto-configuration for disturbing logs it also adds the SPAN ID to all the logs by filtering and interacting with other spring components and generating the Correlation Id passes through to all the system calls.
    2. Zipkin:- Is used for Data-Visualisations 
  6.  Monitoring:- Is used to monitor service metrics health checks and create alerts based on Monitoring and we have different approaches to do that. Let's see the most commonly used approaches.
    1.  Actuator:- is mainly used to expose operational information like health, dump, info, and memory.
    2. Micrometer:- Expose Actuator data in a format that can be understood by the Monitoring system all we need to add vendor-specific Micrometer dependency in the service.
    3. Prometheus:- It is a time-series database to store metric data and also has the data-visualization capability.
    4. Grafana:-  Pulled the data from various data sources like Prometheus and offers rich UI to create custom Dashboard and also allows to set rule-based alerts and notifications. 

We have covered all the relevant components for a successful Microservice Architecture, I build  Microservices using  Spring Framework and all the above Components Code Repo

Happy Coding and Keep Sharing!!
 

Wednesday, 12 October 2022

Deploy Spring Boot API Docker Image to GCP Kubernetes Engine

In the previous blog, we build a demo Spring Boot API and deployed it to Docker Hub using GitHub Actions. In this blog, we will deploy that same docker image to Kubernetes.  A quick recap [read].

In order to deploy the docker image to Google Cloud, we need a Google Cloud Account signup for Free Trail, If you don't have a Google Cloud account already it will first show you the billing page. after that, it will redirect you to the landing page. Here we first need to create a project, because in GC everything we do, we do it in a project, and billing is also generated based on that.


Here you can see all the billing-related information based on your use, after that, we need to go to the services section and click on the left burger menu and select Kubernetes Engine - > Cluster.


Here we first need to create a Cluster because then only we would be able to deploy anything. I have selected the Self-Managed Cluster option,  you can select the same or the recommended one which is then managed by Google.


Here we need to enter the Cluster name followed by the Location Type and the rest of the settings we can leave as default, click on Create button which will start the process of creating a cluster and it will 1-2 mins.

So, the Cluster is created successfully with 12GB of Total Memory, and 6 CPUs which should be sufficient for our demo application to run.

The next step is we need to create our deployment file.

 apiVersion: apps/v1  
 kind: Deployment  
 metadata:  
  name: spring-docker-k8s-deployment  
 spec:  
  replicas: 2  
  selector:  
   matchLabels:  
    app: spring-docker-k8s  
  template:  
   metadata:  
    labels:  
     app: spring-docker-k8s  
   spec:  
    containers:  
     - name: spring-docker-k8s  
      image: hemkant/github-actions  
      ports:  
       - containerPort: 5678  
In this deployment file, I am using the same docker image which we deployed to the docker hub, with just one replica.

Next, we need to execute this deployment file and for that, we can use Google Cloud shell. 


Go to Cluster and click on three dots and Connect, this will open the shell prompt in the browser for us to run kubectl commands, after that we need to run the command to authenticate with GC.


After that, we should be able to upload the deployment file which we created.


Once your file is uploaded you can run ls command to check, and you should see the file in the directory.


Next, we need to run "kubectl apply -f <filename.yaml>"


This command will create the Pods inside the cluster which we created, from the menu go to Workloads.


Here we can see the deployment is done and the status is ok with 2/2 Pods. Next, we need to expose the traffic on a specific port which is 8080 for our application.


After a couple of mins, you can go to the Service & Ingress menu to get the external endpoint to access this application from the public domain. 

That's it we have successfully deployed our Spring Boot API docker image to Google Cloud Kubernetes Engine. Deployment YAML


Happy Coding and Keep Sharing!!


Tuesday, 11 October 2022

SpringBoot API with GitHub Actions, Docker Deployment

Today, We are going to explore and see other possibilities of the most important aspect of SDLC, Which is Continues Integration & Continues Deployment aka CI/CD. There are many tools (Jenkins, Bamboo, etc) available in the market which we can use to Build, Test and Deploy the changes on servers.


In the above diagram, the entire CI/CD is taken care of by Jenkins which is a 3rd party tool. In the real world, this required additional resources (infrastructure) and a team to manage this.

So, since We are using GitHub is there a way we can reduce this additional stuff. Yes, we can use GitHub Actions where the entire CI/CD will run on the same platform. We all have seen this option in GitHub but very rarely do we go there.


To understand it better, let's build a sample Spring Boot application --> Push the code in GitHub -->Trigger Github Actions --> Docker hub.

First, we need to create a repository in GitHub and then go to the Actions tab and click new Workflow options, here we will get many workflow options that we want to integrate with our application, but for this demo, we need to select " Java with Maven".


After you click on configure it will create a maven.yml file which you need to merge with your code, but before that, we need to update the yml to support our application build.


and yes that's it so whenever we merge the code in the master branch the GitHub Actions workflow will trigger and build the code, but we want is that after building the code the, latest changes should also deploy to the Container Registry I am using Docker here, but you can use any other.

In order to push the changes to the docker, we first need to create a repository in the docker hub and after that, we need to tell our maven.yml file about this new step.  

 # This workflow will build a Java project with Maven, and cache/restore any dependencies to improve the workflow execution time  
 # For more information see: https://help.github.com/actions/language-and-framework-guides/building-and-testing-java-with-maven  
 name: Java CI with Maven  
 on:  
  push:  
   branches: [ "master" ]  
  pull_request:  
   branches: [ "master" ]  
 jobs:  
  build:  
   runs-on: ubuntu-latest  
   steps:  
   - uses: actions/checkout@v3  
   - name: Set up JDK 17  
    uses: actions/setup-java@v3  
    with:  
     java-version: '17'  
     distribution: 'temurin'  
     cache: maven  
   - name: Build with Maven  
    run: mvn clean install  
   - name: Build & Push Docker Image  
    uses: mr-smithers-excellent/docker-build-push@v5  
    with:  
     image: hemkant/github-actions  
     tags: latest  
     registry: docker.io  
     dockerfile: Dockerfile  
     username: ${{ secrets.DOCKER_USERNAME}}  
     password: ${{ secrets.DOCKER_PASSWORD}}  
I have used another image here which will perform all the operations docker-build-push. after that, the credentials to access the docker hub is stored in GitHub secrets.


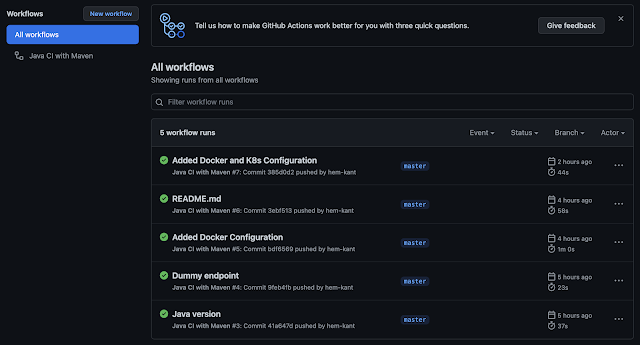
After all of these let's commit some code and see, how all these work together. In the below screenshot, we can see all the workflow triggers whenever I committed the code.


and let's also see if the steps we mentioned in our maven.yml file are followed or not, for that we can click on any item to check and it will show us all the details.


 And the docker file which I used here is 
 FROM openjdk:17  
 EXPOSE 8080  
 ADD target/github-actions.jar github-actions.jar  
 ENTRYPOINT ["java", "-jar", "/github-actions.jar"]  

let's check the Build & Push Docker Image step. looks like everything is fine here, and image is pushed to Docker Hub

The last thing we should also check is Docker Hub, looks good the image is pushed successfully.


We have covered all the points which we discussed at the beginning of this blog. Code Repo.

In the next blog, We will deploy the same image on the Google Cloud Platform, Kubernetes. 

Happy Coding and Keep Sharing!!

Sunday, 9 October 2022

Spring Boot API with MongoDB Atlas

In this blog, We are going to explore and learn the Spring Boot application with MongoDB Atlas. For that, we need to first need to create an account at https://cloud.mongodb.com, and configure some default settings in order to spin a new free cluster. We also get the option to select the cloud provider and region.


after creating the cluster and configuring credentials, we are all set as you can see I have created a new cluster in the AWS cloud, and the Collection is called "task" and it is a shared one so free no charges will apply. 


Next, let's initialize the Spring Boot application for that, we can go to https://start.spring.io/  or if you have a Spring Boot plugin in your IDE you can use that as well.


In the Spring initializer, I have added four dependencies. 
  1. Spring Web:- For building RESTful APIs.
  2. Spring Data MongoDB: -  It is a part of the Spring Data project, which provides integration with the MongoDB document database.
  3. Spring Boot Actuator:- it is a sub-project of Spring Boot and is used for monitoring purposes.
  4. Lombok:- For Java annotations. 
After this, We can generate the code and open it in your favorite IDE. I have written code for CRUD operations to test the API with MongoDB Atlas.

Let's see 1-2 examples.
  • Create some content in MongoDB Atlast using Spring Boot API:

  • Let's invoke the GET by ID endpoint

  • GET ALL endpoint

  • Rest of the operations you can check in the code but one more thing I wanted to show here is how the data is stored in the MongoDB Atlas, for that we can go to the cluster and click on Browse Collection 

There are other things that we can explore such as Realtime Monitoring, Enabling Data API which is available in MongoDB Atlas.


 That's it in this blog. Code Repo.


Happy Coding and Keep Sharing!!

Wednesday, 5 October 2022

Data Structures and Algorithms - Problem - 3 Coin Change challenge 2

In the previous coin challenge, We solved the problem where have an integer array of coins of different denominations and an integer amount representing an amount of money.  and have an infinite number of each coin, and the order of coins doesn't matter, What we need to return is the fewest number of coins that we need to make up that amount.

In this blog, We are going to see another famous coin challenge problem, 

Problem Statement:- Where we are given an integer array of coins representing coins of different denominations and an integer amount representing a total amount of money. 

Return the number of combinations that make up that amount. If that amount of money cannot be made up by any combination of the coins, return 0. 

 Example 1:  
 Input: coins = [5,10]  and  amount = 8
 Output: 0 

In the above example, the Output is 0 because there is no way we can create any combination from the given array to sum 8.

 Example 2:  
 Input: coins = [1,5,10] and  amount = 8
 Output: 2

In example 2, the output is 2 because we can sum 8 in 2 ways from the given array.

 Option 1 :- 1+1+1+1+1+1+1+1 = 8  
 Option 2 :- 5+1+1+1 = 8  

Let's try to solve this in code using a Dynamic Programming approach.


Happy Coding and Keep Sharing!! Code Repo

Data Structures and Algorithms - Problem - 2 Coin Change challenge 1

In this blog, We are going to solve another Dynamic Programming problem using Brute Force and Memoization.


Problem Statement:- You have an integer array of coins of different denominations and an integer amount representing an amount of money.  You have an infinite number of each coin, and the order of coins doesn't matter.

What we need to return is the fewest number of coins that we need to make up that amount.
 Example 1: coins [10,20,50] and the amount is 100  
 Option 1 :- 10 x 10 = 100  
 Option 2 :- 20 x 5 = 100  
 Option 3 :- 50 x 2 = 100  
 Option 4 :- 10 x 8 + 20 x 1 = 100  
As we can see we computed four options by which we can get to 100 using available coins but what we need is the fewest, and in that case, Option 3 is our best option. Now let's understand how we can solve this using Dynamic Programming.

Let's see another example 
 Example 2: coins [10,30,40,50] and the amount is 70  
 Option 1 :- 10 x 7 = 70   
 Option 2 :- 50 x 1 + 10 x 2 = 70  
 Option 3 :- 40 x 1 + 30 x 1 = 70  
In example 2 the fewest coins we would require is 2 as per option 3.

Can we solve this problem using a Greedy algorithm? Which always starts with the biggest number that's why "GREEDY". 

In Example 2,  Option 2 is the example of being Greedy, Where we started with the biggest number but that took us 3 coins value to get the final result, and option 3 took 2 coins value to get the result, Which means the GREEDY algorithm is not we want to use here.

What other approach, we can use here, Dynamic Programming and Brute Force? let's try that. In order to use Bruteforce, We need to implement DFS (Depth First Search)

What we are doing here is we are subtracting the coins {10,30,40,50} from 70 which is our total amount, and we will continue subtracting coins till we reach 0 or stop doing it if the output is negative. 


Let's see the code, and understand how we can solve this problem. In the below code,  we followed example 2 and the output is as expected.


We should try one more example and this time the coins[] = {1,2,3} and amount = 7.  The fewest coins combination would be 3 x 2 + 1 x 1 = 7, which means a total of 3 coins.


In the next blog, we will see another famous coin chance challenge.

Happy Coding and Keep Sharing!! Code Repo