Thursday, 15 November 2018

SDL Tridion Sites 9 New Feature - GraphQL

The New SDL Tridion sites 9 Content API uses GraphQL. GraphQL is a data fetching and Query Language for APIs. It was created by Facebook in 2012 and was open sourced in 2015.

Advantages of GraphQL
  1. Instead of making multiple endpoints call in REST version here in the just single endpoint we can get the data(JSON).
  2. Documentation is available online [click]
  3. Online Community support [click]
GraphQL can be used with multiple deceives, like Facebook developed this to power their mobile application.GraphQL can be used in any application, web application or mobile app many different programming languages support GraphQL [learn more].

So, let get back to the content API, when you install the content API you will see a new endpoint.
content API
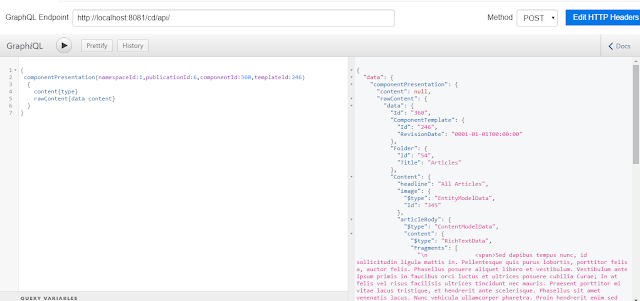
Now, let run some query to get the data but first, we need to install GraphQL client tool, I have GraphiQL installed [download]

Let's run some sample queries.

Page content
Page
Component Presentation
Component Presentation 
Publication
Publication

To learn more, how to structure GraphQL queries the documentation about GraphQL query is available on SDL docs site you can refer that.[link]

Happy coding and keep sharing !!!

SDL Tridion Sites 9 with DXA 2.0 on Windows 10

On Wednesday 7th NOV, SDL Announces the new release SDL Tridion Sites 9 and I got this opportunity to explore this new version and today we are going to install the SDL Tridion 9 on Windows 10 (Not Recommended/supported by SDL though).

The first Step is Install Database by running the PowerShell scripts. I have MSSQL Server 2016 SP2 Developer Edition installed on my local machine and the following DBs are installed.


Next is run the SDLTridionSites9.exe installer but this time from the command line.

Once the step is finished successfully you would able to browse the SDL Tridion Sites 9.
SDL Tridion Sites 9

Next Step is Installed the Content Delivery Microservice and for that go to the installation media folder and navigate to \Content Delivery\resources\quickinstall

First, we need to update the setenv.ps1 and after the run the quickinstall.ps1 
setenv

After the quickinstall.ps1 stop executing go and check the windows services to confirm the service are installed properly and they are running as well.
Microservice
and last the discovery-registration.jar to update the capabilities.

So we finally able to install SDL Tridion Sites 9 and all Microservice on Windows 10 but we also need to updte the Topology Manager to be able to start Publishing and for that, we need to open PowerShell in Administrator mode and run the following command in the sequence.


 > Add-TtmCdTopologyType -Id "TOPOLOGYTYPEID" -Name "TOPOLOGYTYPENAME" -EnvironmentPurposes “PURPOSES”  
 > Add-TtmCdEnvironment -Id "CDENVIRONMENTID" -EnvironmentPurpose "CDENVIRONMENTPURPOSE" -DiscoveryEndpointUrl "DISCOVERYENDPOINTURL"   
 > Add-TtmCdTopology -Id "TOPOLOGYID" -Name "TOPOLOGYNAME" -CdTopologyTypeId "TOPOLOGYTYPEID" -CdEnvironmentIds "CDENVIRONMENTIDS"  
 > Add-TtmWebsite -Id "WEBSITEID" -CdEnvironmentId "CDENVIRONMENTID" -BaseUrls “BASEURLS”  

Once that is done you can create a dummy publication create BPT map that BPT with Topology Type, create SG and page and test publishing.

I've installed the latest DXA CMS import, Downloaded the DXA .NET Framework and we also need DXA-Model-Service from SDL official GitHub, after some tweak in the code I was able to run the DXA web application.
DXA CMS import

DXA WEB Application 


Happy coding and Keep Sharing !!!


Saturday, 10 November 2018

SDL Tridion Sites 9


SDL Tridion DX combines the strengths of SDL Tridion Sites 9 web content management, SDL Tridion Docs, and SDL Language services.

New Features in SDL Tridion Sites 9

  1. Headless Customer Experience 
  2. Dynamic content mashups with taxonomies
  3. Experience optimization 
  4. Regions for easy management of content-rich web pages
  5. Quick and easy image editing
  6. GraphQL-based content service
  7. Docker container support for flexible deployment
  8. SAML 2.0 support for single sign-on
  9. Alibaba Cloud support for websites in China
  10. Staged and rolling scenarios for smoother upgrades

Upgrade to SDL Tridion Sites 9


Upgrading to Sites 9 is easier to upgrade and it reduces risk and costs with zero downtime. The upgrade is available from Tridion 2013 SP1 HR2 and up.


Pre-Requisites for SDL Tridion Sites 9 CM and CD side
  1. Content Manager supports Microsoft Windows server 2016 x64, .NET Framework 4.7.2, Java 8. IIS 10
  2. The Content Delivery side is also known as UDP (Unified Delivery Platform) requires Windows server 2016, Linux/RHEL 6.9 and 7.4, .NET Framework 4.7.2 and Java 8.
  3. Both CM and CD databases support SQL Server Azure, Amazon RDS, MS SQL Server 2016 SP1 / 2017

Stay tuned for more updates on Tridion 9 !!!

Thursday, 8 November 2018

Configure Workers, ActiveMQ and Redis for Scalable Deployment in SDL WEB 8.5

This is in continuation of my previous blogs where we discussed how to install CM and publisher on a dedicated machine and then, we saw how we can implement scale out content deployment using workers, ActiveMQ and Redis. Today, we are going to see how to configure Workes, ActiveMQ and Redis.

To read more about last two blogs in this series:-
  1. Scaling SDL WEB 8.5 Installing CM and Publisher on Dedicated Machines
  2. Scaling Deployers in SDL WEB 8.5
In order to configure the scalable content deployment, we need Deployer(Endpoint) and Deployer-Worker.

Deployer Installation Media
Pre-requisites, we need to install ActiveMQ and Redis
  1. How to install Redis please check my previous blogs.
  2. Download the Apache ActiveMQ
    1. Unzip the package in a suitable location and from command line execute command activemq start.
    2. Open your browser and navigate to the Admin Console at http://localhost:8161

Next step is to configure Deployer-Endpoint and Deployer-Workers Microservices.
  1. Both these services are required to update the deployer_conf.xml and Deployer-Workers required cd_storage_conf.xml.
  2. In the Deployer-Endpoint installation media open deployer_conf.xml.
    1. Here we need to update the <BinaryStorage> node and point this to Redis data store.
      Configure Redis in Deployer-Endpoint
    2. we need to configure the <State> node. so that workers know where to update the status of a job and the endpoint knows from where to get the status of the job.
      Configure State
    3. Next, is we need to configure ActiveMQ, we also need to make sure that all the other <Queue> entries related to FileSystem are commented out.
      Configure Apache ActiveMQ JMS
    4. Save and close the deployer-conf.xml file and use this same file for Workers as well.
    5. Next step is to configure the cd_storage_conf.xml for Deployer-Workers only.
      1. Here we need to update the <Storage> node with the Broker Database details. The worker will deploy the content on this DB.
      2. Update the License file path.
      3. Save and close the file and we can use this same file on the second Deployer-Worker.
    6. Now, we need to configure the ports for Deployer-Endpoint and Deployer-Workers.
    7. Last run the installService.ps1 from the Deployer-Endpoint folder and from Deployer-Worker. You need to run the command more than once depending upon the number of Deployer-Workers you want.
      Deployer-Endpoint and Deployer-Workers are installed  
    8. We have all the services configure and up-running.
    9. The final step is to register your Deployer (Endpoint) with your Discovery Service and run the discovery-registration.jar.


Happy Coding and Keep Sharing


Sunday, 4 November 2018

Scaling Deployers in SDL WEB 8.5

This is in continuation of my previous post where we discussed how to set up Publisher and CM on a dedicated machine to improve the publishing efficiency click here to Read More.

Today we are going to see how to scale out Deployers, using multiple deployers and workers.

High-Level Achrciture diagram 

Steps:

  1. Content is passed to the Deployer after a user Publishes an item in the CME.
  2. The Deployer Endpoint passes the Transport Package (.zip file) to the defined Binary Storage (File System or Redis Database). We are using Redis right now.
  3. The Deployer Endpoint also passes the item to the Queue in ActiveMQ (JMS).
  4. ActiveMQ triggers an event that informs the Worker Deployers that a new package has been received.
  5. The first available Worker Deployer picks up the job from the Queue and contacts the Binary Storage to get the respective Transport Package.
  6. After rendering the Transport Package the Worker Deployer passes the item to the Broker Database.
  7. The Deployer then gets the status of the job from the Broker Database, which is updated by the Worker Deployer responsible for that job.
In the next blog, we'll see how to configure Workers, ActiveMQ and Redis.

Happy Coding and Keep Sharing 


Multiple Destination Publishing Using - MIRROR strategy in SDL WEB 8.5

What is Multiple Destination Publishing?


Multiple destination publishing means that the transport service can publish to multiple deployer destinations (if you have more than one deployer).

DEFAULT strategy means that there will be only one deployer only one URL is registered in discovery-service).

MIRROR strategy means that you can have more than one deployer (multiple URLs are registered in discovery-service) and transport service will send the package to all of the deployer URLs register in discovery service.

How to configure Multiple Destination Publishing?


We can do this by defining the strategy for the DeployerCapability which is registered in the Discovery Microservice cd_storage.conf.xml:

If you have set up multiple Content Deployer destinations, do the following in order to setup MIRROR strategy:

  1. Ensure that this Role element has a Strategy attribute, set to MIRROR.
  2. Inside the Role element, insert a Urls subsection, itself containing two or more Url subelements. Each Url element must have a Value attribute, set to the URL of the destination, and can have a DestinationName attribute, set to the name of this destination

Strategy Attribute 

This Role has one Capability URL (value DEFAULT, to be specified in the Url attribute) 
or multiple ones value MIRROR, to be specified in the URLs subsection. Defaults to DEFAULT is not specified.

Happy Coding and Keep Sharing !!!