Showing posts with label Docker. Show all posts

Sunday 8 January 2023

Microservice Architecture in .NET

In my previous blog we already discussed Microservice Architecture using Java but today we are going to develop and understand how we can leverage the Microservice architecture using .NET core API, and what all tools we can use to make it Resilience, observability, Fault-tolerance, Monitoring, and Rate-limiting and all other components which are necessary for any Microservice driven architecture.   

Before we move forward let's review some PROS and CONS of having Microservice and Monolithic architecture.


To start with let's build an example, where we are going to create a Catalog and Inventory APIs and build our Microservice architecture around it. So the big question comes when to use Microservices?

  • It's fine to start with a monolith and then move to Microservices 
  • And We should start looking at Microservice when:
    • The code base size is more than what a small team can maintain
    • A team can't move fast anymore
    • Build because too slow due to large code base
    • Time to market is compromised due to infrequent deployments and long testing times.
  • It's all about team autonomy.

In our previous Microservice architecture in JAVA, we build Microservice which communicates synchronously but today we are going to build an asynchronous Microservice, and will also understand its benefits.


Synchronous Communication 

  • The client sends a request and waits for a response from the service which is exactly happening in our Mircorservice example in JAVA
  • The client cannot process without the response.
  • The client thread may use blocking or non-blocking callbacks.
  • REST+HTTP protocol is the traditional approach
  • Partial failures will happen.
  • In a distributed system whenever a service makes a synchronous request to another service, there is a risk of partial failure.
  • So, We must design our services to be resilient 
  • Timeouts, for more response experience and to ensure resources are never tied up 
  • Implement a Circuit breaker pattern to prevent our service from reaching resource exhaustion 

Asynchronous Communication

  • The client does not wait for a response in a timely manner
  • There might be no response at all
  • Usually involves the use of a lightweight message broker
  • Message broker has high availability 
  • Messages are sent to the broker and could be received by a single receiver or multiple receivers 

In the Asynchronous Microservice, which I build. 

  • For resilience and transient-fault handling capabilities, Retry, and Circuit Breaker.  I have used Polly.NET libraries.
  • For API Gateway, Caching, and Rate Limiting, I have used Ocelot .NET libraries. 
  • For Monitoring, I have used Prometheus and Grafana.
  • RabbitMQ is used for messaging.
  • MongoDB is used to store the data.

The Code is available on GitHub

Happy coding and keep sharing!!

Wednesday 12 October 2022

Deploy Spring Boot API Docker Image to GCP Kubernetes Engine

In the previous blog, we build a demo Spring Boot API and deployed it to Docker Hub using GitHub Actions. In this blog, we will deploy that same docker image to Kubernetes.  A quick recap [read].

In order to deploy the docker image to Google Cloud, we need a Google Cloud Account signup for Free Trail, If you don't have a Google Cloud account already it will first show you the billing page. after that, it will redirect you to the landing page. Here we first need to create a project, because in GC everything we do, we do it in a project, and billing is also generated based on that.


Here you can see all the billing-related information based on your use, after that, we need to go to the services section and click on the left burger menu and select Kubernetes Engine - > Cluster.


Here we first need to create a Cluster because then only we would be able to deploy anything. I have selected the Self-Managed Cluster option,  you can select the same or the recommended one which is then managed by Google.


Here we need to enter the Cluster name followed by the Location Type and the rest of the settings we can leave as default, click on Create button which will start the process of creating a cluster and it will 1-2 mins.

So, the Cluster is created successfully with 12GB of Total Memory, and 6 CPUs which should be sufficient for our demo application to run.

The next step is we need to create our deployment file.

 apiVersion: apps/v1  
 kind: Deployment  
 metadata:  
  name: spring-docker-k8s-deployment  
 spec:  
  replicas: 2  
  selector:  
   matchLabels:  
    app: spring-docker-k8s  
  template:  
   metadata:  
    labels:  
     app: spring-docker-k8s  
   spec:  
    containers:  
     - name: spring-docker-k8s  
      image: hemkant/github-actions  
      ports:  
       - containerPort: 5678  
In this deployment file, I am using the same docker image which we deployed to the docker hub, with just one replica.

Next, we need to execute this deployment file and for that, we can use Google Cloud shell. 


Go to Cluster and click on three dots and Connect, this will open the shell prompt in the browser for us to run kubectl commands, after that we need to run the command to authenticate with GC.


After that, we should be able to upload the deployment file which we created.


Once your file is uploaded you can run ls command to check, and you should see the file in the directory.


Next, we need to run "kubectl apply -f <filename.yaml>"


This command will create the Pods inside the cluster which we created, from the menu go to Workloads.


Here we can see the deployment is done and the status is ok with 2/2 Pods. Next, we need to expose the traffic on a specific port which is 8080 for our application.


After a couple of mins, you can go to the Service & Ingress menu to get the external endpoint to access this application from the public domain. 

That's it we have successfully deployed our Spring Boot API docker image to Google Cloud Kubernetes Engine. Deployment YAML


Happy Coding and Keep Sharing!!


Tuesday 11 October 2022

SpringBoot API with GitHub Actions, Docker Deployment

Today, We are going to explore and see other possibilities of the most important aspect of SDLC, Which is Continues Integration & Continues Deployment aka CI/CD. There are many tools (Jenkins, Bamboo, etc) available in the market which we can use to Build, Test and Deploy the changes on servers.


In the above diagram, the entire CI/CD is taken care of by Jenkins which is a 3rd party tool. In the real world, this required additional resources (infrastructure) and a team to manage this.

So, since We are using GitHub is there a way we can reduce this additional stuff. Yes, we can use GitHub Actions where the entire CI/CD will run on the same platform. We all have seen this option in GitHub but very rarely do we go there.


To understand it better, let's build a sample Spring Boot application --> Push the code in GitHub -->Trigger Github Actions --> Docker hub.

First, we need to create a repository in GitHub and then go to the Actions tab and click new Workflow options, here we will get many workflow options that we want to integrate with our application, but for this demo, we need to select " Java with Maven".


After you click on configure it will create a maven.yml file which you need to merge with your code, but before that, we need to update the yml to support our application build.


and yes that's it so whenever we merge the code in the master branch the GitHub Actions workflow will trigger and build the code, but we want is that after building the code the, latest changes should also deploy to the Container Registry I am using Docker here, but you can use any other.

In order to push the changes to the docker, we first need to create a repository in the docker hub and after that, we need to tell our maven.yml file about this new step.  

 # This workflow will build a Java project with Maven, and cache/restore any dependencies to improve the workflow execution time  
 # For more information see: https://help.github.com/actions/language-and-framework-guides/building-and-testing-java-with-maven  
 name: Java CI with Maven  
 on:  
  push:  
   branches: [ "master" ]  
  pull_request:  
   branches: [ "master" ]  
 jobs:  
  build:  
   runs-on: ubuntu-latest  
   steps:  
   - uses: actions/checkout@v3  
   - name: Set up JDK 17  
    uses: actions/setup-java@v3  
    with:  
     java-version: '17'  
     distribution: 'temurin'  
     cache: maven  
   - name: Build with Maven  
    run: mvn clean install  
   - name: Build & Push Docker Image  
    uses: mr-smithers-excellent/docker-build-push@v5  
    with:  
     image: hemkant/github-actions  
     tags: latest  
     registry: docker.io  
     dockerfile: Dockerfile  
     username: ${{ secrets.DOCKER_USERNAME}}  
     password: ${{ secrets.DOCKER_PASSWORD}}  
I have used another image here which will perform all the operations docker-build-push. after that, the credentials to access the docker hub is stored in GitHub secrets.


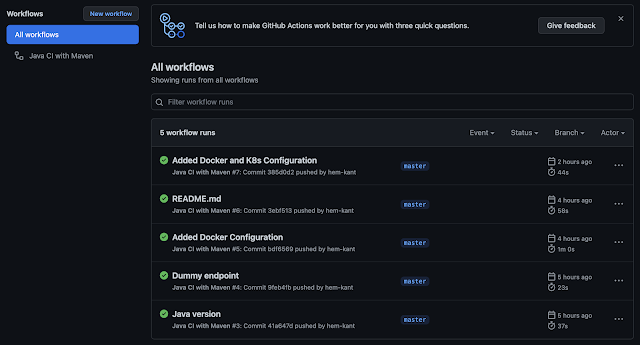
After all of these let's commit some code and see, how all these work together. In the below screenshot, we can see all the workflow triggers whenever I committed the code.


and let's also see if the steps we mentioned in our maven.yml file are followed or not, for that we can click on any item to check and it will show us all the details.


 And the docker file which I used here is 
 FROM openjdk:17  
 EXPOSE 8080  
 ADD target/github-actions.jar github-actions.jar  
 ENTRYPOINT ["java", "-jar", "/github-actions.jar"]  

let's check the Build & Push Docker Image step. looks like everything is fine here, and image is pushed to Docker Hub

The last thing we should also check is Docker Hub, looks good the image is pushed successfully.


We have covered all the points which we discussed at the beginning of this blog. Code Repo.

In the next blog, We will deploy the same image on the Google Cloud Platform, Kubernetes. 

Happy Coding and Keep Sharing!!

Monday 3 September 2018

Installing SDL Content Delivery Microservices in Docker

In the last couple of blogs, we learned how to use Docker with SDL DXA Html-Theming and SDL DXA. Today we are going to setup Microservices in Docker. The microservices, also called Content Interaction Services, are the server-side components of Content Delivery. The Microservices is based on Java Spring-boot which uses embedded Tomcat to run the Services.

To learn more about SDL DXA, DXA Html-theming and SDL WEB with docker, please follow below links.
  1. SDL WEB, Docker and Cloud Containerization
  2. Run DXA in Docker
  3. DXA theming in Docker
After this, we can say that we managed to run SDL Content Delivery Environment in Docker.

I downloaded the latest CD HotFix from SDL FTP. In this blog, we are going to Install Content and Context Microservices in docker.

Steps:-
  1. Download the latest CD HotFixes.
  2. Create a new Folder and copy the Content standalone folder in it.
  3. Configure cd_Storage_conf.xml file.
  4. Copy License file in the config folder.
  5. Update Logback.xml
  6. Create Docker File in the root.
Docker File
1:  FROM java:8  
2:  COPY Contentstandalone /  
3:  RUN chmod +x /bin/start.sh  
4:  CMD bash -C '/bin/start.sh'  
5:  EXPOSE 8091  
Next, is we need to BUILD the Docker container.
 docker build -t content-service-staging .  
If everything goes well and it builds successfully next is RUN it.
 docker run -p 8091:8091 content-service-staging  

Below is the output of the above command.

Build Container 


Run the docker container 
Let's browse the Content service


Content Microservice running in Docker

SDL Content Microservice is up and running. Similarly, I followed the same steps in order to install the Context Microservice.

Context Microservice

Context Microservice is up and running in Docker

So, We've Dockerised SDL Content and Context Microservices, it was quick and simple most of the changes/configuration we did is the standard part of the installation of the SDL Microservices.

Happy Coding and Keep Sharing !!!!

Saturday 28 July 2018

SDL Web, Docker and Cloud Containerization

What are containers


       Containers are a way to package software in a format that can run isolated on a shared operating system.
       A container wraps an application in a complete package that contains everything to run the application – code, libraries, dependencies, runtimes.
       A container image is a lightweight, stand-alone, executable package of a piece of software that includes everything needed to run it: code, runtime, system tools, system libraries, settings. Available for both Linux and Windows-based apps, the containerized software will always run the same, regardless of the environment
       Containers isolate software from its surroundings, for example, differences between development and staging environments and help reduce conflicts between teams running different software on the same infrastructure.

What is Docker


       Docker is a leading platform for Containerization of the application
       Docker allows you to package all pieces of your application into a single container so that your application will run same everywhere without worrying about the environment dependency and complexities.
       Docker is a tool that is designed to benefit both developers and system administrators, making it a part of many DevOps.
       For developers, it means that they can focus on writing code without worrying about the system that it will ultimately be running on.
       In a way, Docker is a bit like a virtual machine. But unlike a virtual machine, rather than creating a whole virtual operating system.
       It is a tool designed to make it easier to create, deploy, and run applications by using containers. Containers allow a developer to package up an application with all of the parts it needs, such as libraries and other dependencies, and ship it all out as one package.

Containers Vs Virtual Machine


       Containers are an abstraction at the app layer that packages code and dependencies together. 
       Containers take up less space than VMs
       Virtual machines (VMs) are an abstraction of physical hardware turning one server into many servers
       Each VM includes a full copy of an operating system. VMs can also be slow to boot


Docker Advantages


          Automation of repetitive and tedious deployment tasks.
          Faster onboarding of new resource.
          Faster shipment of new features and fixes without downtime.
          Easy and real-time scaling of application.
          Easy Distribution, Share, and Configuration of applications.
          High security out of the box.
          Improve efficiency of DevOps.
          Modernize traditional apps faster and without investing huge without going through complete SDLC.

Docker Disadvantages


          Better performance than Virtual Machines but slower than Bare-Metal.
          Isolation and security are lesser as compared to the Virtual Machines.
          Storing data such that it is available even after the container is shut down is quite complicated.
       Not all applications benefit from containers – Cannot be blindly adopted for each and every application.

 Comparison between AWS, Google, and Azure Cloud Containerization


AWS Cloud – The AWS Cloud provides Amazon EC2 Container Services (Amazon ECS) which support container application and so let you run your Docker containers on a managed cluster of Amazon EC2 instances.

Google Cloud – Google offers Google Container Engine which lets you run Docker containers on Google Cloud.

MS Azure – Microsoft also offers Azure container service to allow deployment, management, and execution of Container applications.

Docker and SDL WEB 

With the release of SDL Web, the Dockerization becomes quite easy

SDL Web is quite Docker friendly because of the following:
·         Micro-service based architecture.
·         Parameterized config files.
             ·       License-free web application.

SDL WEB – Advantages of using Docker

  •         Great time and effort saving for DevOps
  •         Complexities of SDL CD Deployment is encapsulated and allows the non-Tridion experts to do the deployment.
  •         Scaling of servers is quite easy.
  •         The overall cost of resources will be optimized as compared to Virtual Machines.
   Happy Coding and Keep Sharing !!!!

Saturday 23 June 2018

SDL Tridion with IBM Watson Tone Analyzer

The Tone Analyzer service analyzes the tone of input content.

One of the advancements of artificial intelligence and machine learning to content management systems is understanding the performance of content. Content creators can analyze how content has come across to readers, which tone resonates with which audience.

As a content creator and marketer, being able to perform tone analyzing is one of the best features powered by machine learning. IBM Watson Tone Analyzer service as it detects emotional, social, and language tones in written text. The Tone Analyzer provides insight on how the content is coming across to readers, and for each sub-tone, it provides a score between 0 and 1 if the score is 0.75 or higher is considered most accurate.

In this article, we are going to see how we can use this service with SDL Tridion to analyze the website content tone. I have created an ASP.NET MVC application and used it as a custom page in Tridion.

Custom Page

 In this application, we have three sections.
  • Read data based on URL we enter and it will analyze the content tone. 
  • Analyzed data based on the custom text "your own text".
  • And last is "Endpoint is exposed it will take the text as input and returns JSON ".

Let's see how it works with the website URL, here we need to enter the URL of our website or any link that we want to analyze and the application will read all its HTML text attributes and its content. In the given example I have configured H1, H2, H3, H4 and P tags we can configure other tags as well. So any URL that we enter, the application will scan that webpage and extract the data of all the above attributes and send it to IBM Tone service to analyze. For the demo, I scanned the Analyzer web application itself to see how the content has come across to readers.

Analyzed Content by URL

Next, is custom text, Here you can enter the text manually and understand the tone before we actually published it or entering in any component.

Your Own Custom Text
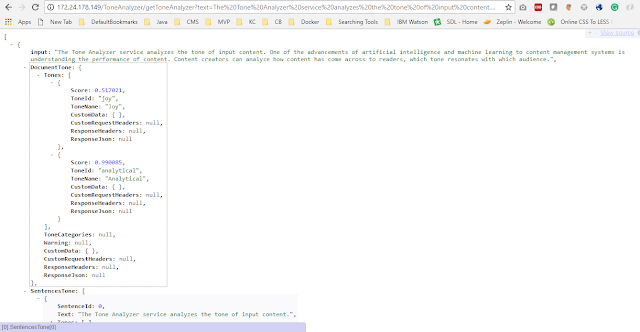
The last one is an Endpoint that will take text input and returns JSON data. So if you want to use this service you can use this endpoint directly.

Endpoint

Finally, this is also available on Docker I pushed this on my Docker account you can download the docker image and explore the Tone Analyzer service. This has some limitation since I am using Dev account here, only limited service calls are allowed.

Docker Image


Happy Coding and Keep Sharing !!!!

Saturday 17 March 2018

RUN SDL DXA inside Windows Docker Container

In one of my previous blog post, we learned, How to run SDL DXA theming inside Docker. Today we are going to run SDL DXA in Window Docker. It is really quick and easy. To learn more about my previous blog post click here.

Steps to setup you SDL DXA-WEBAPP in Docker

  1. Download DXA latest version from SDL GITHUB account.
  2. Create a folder at any location, this path will be used as a physical location when you run the web-install.ps1.
  3. Go to the Root directory and create Dockerfile.
  4. Here, it is very important to understand that what all you need to have in your DockerFile. I faced couple of issues while I was working on this but managed to solve all of them.
  5. Once your SDL DXA is installed copy and paste below sample Dockerfile content in your file.
  6.  FROM microsoft/aspnet  
     RUN New-Item c:\sdldxaindocker -type directory  
     WORKDIR /sdldxaindocker  
     COPY ./DXADOCKER/ .  
     RUN Remove-WebSite -Name 'Default Web Site'   
     RUN New-Website -Name 'DXADOCKER' -Port 80 -PhysicalPath 'c:\sdldxaindocker'  -ApplicationPool '.NET v4.5'  
    
  7. Open PowerShell in Admin mode and navigate to root directory created in step 2.
  8. Run the following Docker commands.
    • docker build -t sdldxaindocker .     (refer ScreenShot 1)
    • docker run -d --name sdldxaindockerimage sdldxaindocker  (refer Screenshot 2)
    • docker inspect -f  "{{ NetworkSettings.Networks.nat.IPAddress }}" sdldxaindockerimage  (refer ScreenShot 3)
  9. Last step set-TtmWebsite and update the -BaseUrls
Advantages of using Docker.
  1. You can connect your source code with docker and with this it will keep your code in-sync/updated with your Docker container and solve your CI problems.
  2. You can run this container on any platform.
  3. Automate your build and test pipelines and accelerate your software development.
  4. Minimum Infrastructure.
  5. Load-Balancing can be managed easily.
  6. Improve Efficiency of DevOps.
  7. Easy Distribution, share, and configuration of applications.
  8. Easy and real-time scaling of application 

The output of your Docker commands.

ScreenShot 1
ScreenShot 2
Screenshot 3

Browse the URL http://172.24.179.102/


Happy coding and keep sharing !!!!

Saturday 25 November 2017

Storage Extension Using ElasticSearch and Docker


The latest release of the ElasticSearch4Web8 framework is much more clean, easy in use, less configuration and setup steps are required.To know more about the previous release refer this link.

In the previous version of this framework, apart from CMS and Deployer setup steps, we were required to host custom WCF based Index service, install and configure ElasticSearch. In this release, I've moved all these on Docker.

So, now instead of downloading code host the Index service and ElasticSearch all we need to do is Docker Pull and you will have all the pre-requisites up and running.

Steps to setup latest version of this framework:-
  1. CMS setup
    • Copy and paste the templating building block (TBB) to a location on your SDL WEB 8 CM Server
    • Upload ESI4TIndexing.Templating.dll TBB to WEB 8 CMS using TcmUploadAssembly.exe
    • Create a Component Template with following attributes
      • Output Format – XML Fragment
      • Add GetComponentAsXML TBB ,Publish Binaries in Package, Link Resolver and Cleanup Template.
  2. To setup Elasticsearch run following docker commands.
    • docker pull hemkant/elasticsearch .
    • docker run -p 9200:9200 -m3gb hemkant/elasticsearch
  3. To setup generic, WCF IndexService run following docker commands.
    • docker pull hemkant/elasticsearchintegration4web8 .
    • docker run -p 83:83 hemkant/elasticsearchintegration4web8
  4. To verify all the docker containers are up and running run docker ps command
  5. All these containers are available on hub.docker.com
  6. The last step is setup Deployer service
    • Open the cd_storage_config.xml Storage Configuration file from the /bin/config folder and add following node under the Storages section:
      • <StorageBindings><Bundle src="CustomStorageDAOBundles.xml"/></StorageBindings>
    • Copy and paste CustomStorageConfig.xml file to change the value of following nodes
      • ServiceEndPoint - URL of the IndexService
      • TemplateIdToIndex - Tcm Id Of component Template which we have created in step 1 CMS setup. 
    • Copy the CustomStorageDAOBundles.xml XML file in the Content Delivery /bin/config folder

That's all we need. We have configured the ElasticSearch integration with SDL WEB  now publish the components and data will be stored in ElasticSearch.


Happy coding and keep sharing !!!

Friday 20 October 2017

How to dockerize SDL DXA theming module

Docker keeps our code and its dependencies together and lets us more fully utilize our Infrastructure resources.

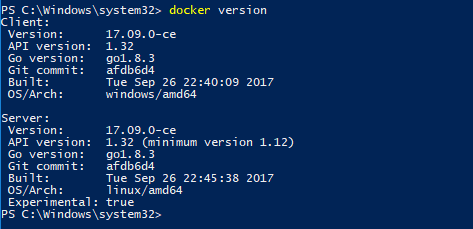
Today we are going to create a Docker image which contains SDL DXA-theming module before we begin we need to install Docker download the Docker windows installer and run, once installation is finished Docker will start automatically, you can check the whale icon in the notification area. I am running on Docker windows container.

Docker version

We are done with the installation. Now let's talks about 

Docker:- Docker is a tool that is designed to benefit both developers and system administrators, making it a part of many DevOps.

For developers, it means that they can focus on writing code without worrying about the system that it will ultimately be running on.

In a way, Docker is a bit like a virtual machine. But unlike a virtual machine, rather than creating a whole virtual operating system.

It is a tool designed to make it easier to create, deploy, and run applications by using containers. Containers allow a developer to package up an application with all of the parts it needs, such as libraries and other dependencies, and ship it all out as one package. 

SDL DXA-Theming module:- It is used to manage HTML-design create microsites with very minimum efforts.DXA is build using responsive design HTML5 and Bootstrap.It gives us the flexibility to change the design as per requirement.To know more about the DXA-theming please refer my previous blogs here.

Let's begin with creating our first Docker Image.


I already have DXA 1.7 available on my local machine you can download from official SDL GitHub account. Every application requires a specific working environment: pre-installed applications, dependencies, databases, everything in a specific version. Docker containers allow you to create such environments.

As a first step, we need to create DockerFile.

The Docker container is launched on the basis of a Docker image, a template with the application details. The Docker image is created with instructions written in the Dockerfile. Let's add Dockerfile to the directory with our application:

DockerFile


Line 1: Use another Docker image for the template of my image. We shall use the official Node.js image with Node v8.

Line 2: Set working dir in the container to /.design. We shall use this directory to store files, run npm, and launch our application:

Line 3-5: Copy application to /.design directory and install dependencies. If you add the package.json first and run npm install later, Docker won't have to install the dependencies again if you change the package.json file. This results from the way the Docker image is being built (layers and cache).

Line 6: This line describes what should be executed when the Docker image is launching.

Line 7: Expose port 9000 to the outside once the container has launched:

Build Docker Image


Docker comes with pre-defined sets of commands which we can run using powerShell (should be running in Admin mode).Run the docker build command, set the name of our image with -t parameter, and choose the directory with the Dockerfile.

docker build -t hemkant/dxa-theming .

Build Docker Image

Run the Docker Image

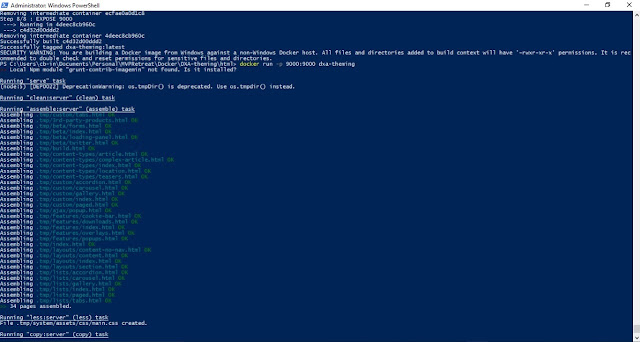
The DXA-Theming module has been saved as an image now we need to run the docker run command. Image name should be in lower case.

docker run -p 9000:9000 hemkant/dxa-theming
Run Docker Image

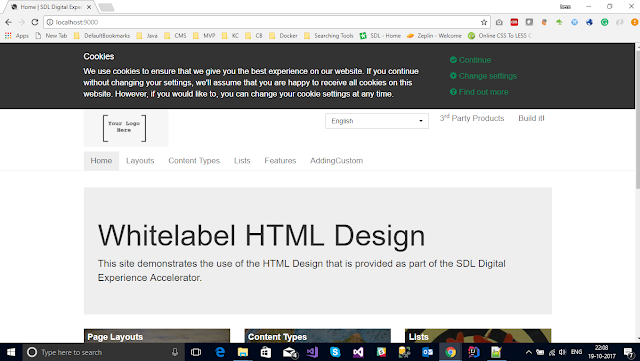
The application is ready to browse using http://localhost:9000 running in docker.

Browse-WhiteLabel HTML Design

Sharing Docker Image

Sharing is carrying. Docker images can be hosted and shared. The most popular are Docker Hub, a GitHub among Docker registries, in which you can host private and public images. Let's push an image to Docker Hub now:

  1. Sign-up at hub.docker.com.
  2. Run the following two commands
  3. docker build -t hemkant/dxa-theming
  4. docker push hemkant/dxa-theming
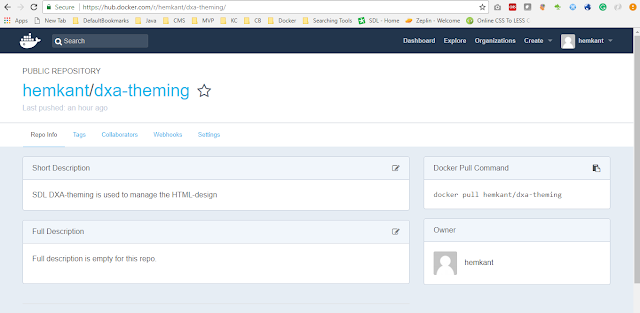
Upload image on docker hub.

Docker hub

Once your image is uploaded it's now available to re-use without any hassle by installing the Docker and run the below command easy and cool. You don't have to install Node, bower, NPM, and Grunt on your local machine to run DXA-theming module because everything is already shipped into Docker.

docker run hemkant/dxa-theming


Happy coding and keep sharing!!.