Wednesday, 12 October 2022

Deploy Spring Boot API Docker Image to GCP Kubernetes Engine

In the previous blog, we build a demo Spring Boot API and deployed it to Docker Hub using GitHub Actions. In this blog, we will deploy that same docker image to Kubernetes.  A quick recap [read].

In order to deploy the docker image to Google Cloud, we need a Google Cloud Account signup for Free Trail, If you don't have a Google Cloud account already it will first show you the billing page. after that, it will redirect you to the landing page. Here we first need to create a project, because in GC everything we do, we do it in a project, and billing is also generated based on that.


Here you can see all the billing-related information based on your use, after that, we need to go to the services section and click on the left burger menu and select Kubernetes Engine - > Cluster.


Here we first need to create a Cluster because then only we would be able to deploy anything. I have selected the Self-Managed Cluster option,  you can select the same or the recommended one which is then managed by Google.


Here we need to enter the Cluster name followed by the Location Type and the rest of the settings we can leave as default, click on Create button which will start the process of creating a cluster and it will 1-2 mins.

So, the Cluster is created successfully with 12GB of Total Memory, and 6 CPUs which should be sufficient for our demo application to run.

The next step is we need to create our deployment file.

 apiVersion: apps/v1  
 kind: Deployment  
 metadata:  
  name: spring-docker-k8s-deployment  
 spec:  
  replicas: 2  
  selector:  
   matchLabels:  
    app: spring-docker-k8s  
  template:  
   metadata:  
    labels:  
     app: spring-docker-k8s  
   spec:  
    containers:  
     - name: spring-docker-k8s  
      image: hemkant/github-actions  
      ports:  
       - containerPort: 5678  
In this deployment file, I am using the same docker image which we deployed to the docker hub, with just one replica.

Next, we need to execute this deployment file and for that, we can use Google Cloud shell. 


Go to Cluster and click on three dots and Connect, this will open the shell prompt in the browser for us to run kubectl commands, after that we need to run the command to authenticate with GC.


After that, we should be able to upload the deployment file which we created.


Once your file is uploaded you can run ls command to check, and you should see the file in the directory.


Next, we need to run "kubectl apply -f <filename.yaml>"


This command will create the Pods inside the cluster which we created, from the menu go to Workloads.


Here we can see the deployment is done and the status is ok with 2/2 Pods. Next, we need to expose the traffic on a specific port which is 8080 for our application.


After a couple of mins, you can go to the Service & Ingress menu to get the external endpoint to access this application from the public domain. 

That's it we have successfully deployed our Spring Boot API docker image to Google Cloud Kubernetes Engine. Deployment YAML


Happy Coding and Keep Sharing!!


Tuesday, 11 October 2022

SpringBoot API with GitHub Actions, Docker Deployment

Today, We are going to explore and see other possibilities of the most important aspect of SDLC, Which is Continues Integration & Continues Deployment aka CI/CD. There are many tools (Jenkins, Bamboo, etc) available in the market which we can use to Build, Test and Deploy the changes on servers.


In the above diagram, the entire CI/CD is taken care of by Jenkins which is a 3rd party tool. In the real world, this required additional resources (infrastructure) and a team to manage this.

So, since We are using GitHub is there a way we can reduce this additional stuff. Yes, we can use GitHub Actions where the entire CI/CD will run on the same platform. We all have seen this option in GitHub but very rarely do we go there.


To understand it better, let's build a sample Spring Boot application --> Push the code in GitHub -->Trigger Github Actions --> Docker hub.

First, we need to create a repository in GitHub and then go to the Actions tab and click new Workflow options, here we will get many workflow options that we want to integrate with our application, but for this demo, we need to select " Java with Maven".


After you click on configure it will create a maven.yml file which you need to merge with your code, but before that, we need to update the yml to support our application build.


and yes that's it so whenever we merge the code in the master branch the GitHub Actions workflow will trigger and build the code, but we want is that after building the code the, latest changes should also deploy to the Container Registry I am using Docker here, but you can use any other.

In order to push the changes to the docker, we first need to create a repository in the docker hub and after that, we need to tell our maven.yml file about this new step.  

 # This workflow will build a Java project with Maven, and cache/restore any dependencies to improve the workflow execution time  
 # For more information see: https://help.github.com/actions/language-and-framework-guides/building-and-testing-java-with-maven  
 name: Java CI with Maven  
 on:  
  push:  
   branches: [ "master" ]  
  pull_request:  
   branches: [ "master" ]  
 jobs:  
  build:  
   runs-on: ubuntu-latest  
   steps:  
   - uses: actions/checkout@v3  
   - name: Set up JDK 17  
    uses: actions/setup-java@v3  
    with:  
     java-version: '17'  
     distribution: 'temurin'  
     cache: maven  
   - name: Build with Maven  
    run: mvn clean install  
   - name: Build & Push Docker Image  
    uses: mr-smithers-excellent/docker-build-push@v5  
    with:  
     image: hemkant/github-actions  
     tags: latest  
     registry: docker.io  
     dockerfile: Dockerfile  
     username: ${{ secrets.DOCKER_USERNAME}}  
     password: ${{ secrets.DOCKER_PASSWORD}}  
I have used another image here which will perform all the operations docker-build-push. after that, the credentials to access the docker hub is stored in GitHub secrets.


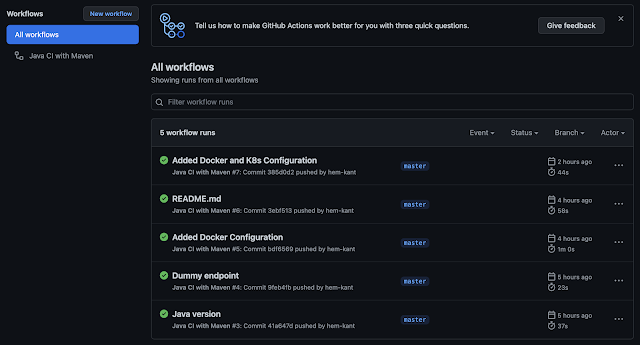
After all of these let's commit some code and see, how all these work together. In the below screenshot, we can see all the workflow triggers whenever I committed the code.


and let's also see if the steps we mentioned in our maven.yml file are followed or not, for that we can click on any item to check and it will show us all the details.


 And the docker file which I used here is 
 FROM openjdk:17  
 EXPOSE 8080  
 ADD target/github-actions.jar github-actions.jar  
 ENTRYPOINT ["java", "-jar", "/github-actions.jar"]  

let's check the Build & Push Docker Image step. looks like everything is fine here, and image is pushed to Docker Hub

The last thing we should also check is Docker Hub, looks good the image is pushed successfully.


We have covered all the points which we discussed at the beginning of this blog. Code Repo.

In the next blog, We will deploy the same image on the Google Cloud Platform, Kubernetes. 

Happy Coding and Keep Sharing!!

Sunday, 9 October 2022

Spring Boot API with MongoDB Atlas

In this blog, We are going to explore and learn the Spring Boot application with MongoDB Atlas. For that, we need to first need to create an account at https://cloud.mongodb.com, and configure some default settings in order to spin a new free cluster. We also get the option to select the cloud provider and region.


after creating the cluster and configuring credentials, we are all set as you can see I have created a new cluster in the AWS cloud, and the Collection is called "task" and it is a shared one so free no charges will apply. 


Next, let's initialize the Spring Boot application for that, we can go to https://start.spring.io/  or if you have a Spring Boot plugin in your IDE you can use that as well.


In the Spring initializer, I have added four dependencies. 
  1. Spring Web:- For building RESTful APIs.
  2. Spring Data MongoDB: -  It is a part of the Spring Data project, which provides integration with the MongoDB document database.
  3. Spring Boot Actuator:- it is a sub-project of Spring Boot and is used for monitoring purposes.
  4. Lombok:- For Java annotations. 
After this, We can generate the code and open it in your favorite IDE. I have written code for CRUD operations to test the API with MongoDB Atlas.

Let's see 1-2 examples.
  • Create some content in MongoDB Atlast using Spring Boot API:

  • Let's invoke the GET by ID endpoint

  • GET ALL endpoint

  • Rest of the operations you can check in the code but one more thing I wanted to show here is how the data is stored in the MongoDB Atlas, for that we can go to the cluster and click on Browse Collection 

There are other things that we can explore such as Realtime Monitoring, Enabling Data API which is available in MongoDB Atlas.


 That's it in this blog. Code Repo.


Happy Coding and Keep Sharing!!

Wednesday, 5 October 2022

Data Structures and Algorithms - Problem - 3 Coin Change challenge 2

In the previous coin challenge, We solved the problem where have an integer array of coins of different denominations and an integer amount representing an amount of money.  and have an infinite number of each coin, and the order of coins doesn't matter, What we need to return is the fewest number of coins that we need to make up that amount.

In this blog, We are going to see another famous coin challenge problem, 

Problem Statement:- Where we are given an integer array of coins representing coins of different denominations and an integer amount representing a total amount of money. 

Return the number of combinations that make up that amount. If that amount of money cannot be made up by any combination of the coins, return 0. 

 Example 1:  
 Input: coins = [5,10]  and  amount = 8
 Output: 0 

In the above example, the Output is 0 because there is no way we can create any combination from the given array to sum 8.

 Example 2:  
 Input: coins = [1,5,10] and  amount = 8
 Output: 2

In example 2, the output is 2 because we can sum 8 in 2 ways from the given array.

 Option 1 :- 1+1+1+1+1+1+1+1 = 8  
 Option 2 :- 5+1+1+1 = 8  

Let's try to solve this in code using a Dynamic Programming approach.


Happy Coding and Keep Sharing!! Code Repo

Data Structures and Algorithms - Problem - 2 Coin Change challenge 1

In this blog, We are going to solve another Dynamic Programming problem using Brute Force and Memoization.


Problem Statement:- You have an integer array of coins of different denominations and an integer amount representing an amount of money.  You have an infinite number of each coin, and the order of coins doesn't matter.

What we need to return is the fewest number of coins that we need to make up that amount.
 Example 1: coins [10,20,50] and the amount is 100  
 Option 1 :- 10 x 10 = 100  
 Option 2 :- 20 x 5 = 100  
 Option 3 :- 50 x 2 = 100  
 Option 4 :- 10 x 8 + 20 x 1 = 100  
As we can see we computed four options by which we can get to 100 using available coins but what we need is the fewest, and in that case, Option 3 is our best option. Now let's understand how we can solve this using Dynamic Programming.

Let's see another example 
 Example 2: coins [10,30,40,50] and the amount is 70  
 Option 1 :- 10 x 7 = 70   
 Option 2 :- 50 x 1 + 10 x 2 = 70  
 Option 3 :- 40 x 1 + 30 x 1 = 70  
In example 2 the fewest coins we would require is 2 as per option 3.

Can we solve this problem using a Greedy algorithm? Which always starts with the biggest number that's why "GREEDY". 

In Example 2,  Option 2 is the example of being Greedy, Where we started with the biggest number but that took us 3 coins value to get the final result, and option 3 took 2 coins value to get the result, Which means the GREEDY algorithm is not we want to use here.

What other approach, we can use here, Dynamic Programming and Brute Force? let's try that. In order to use Bruteforce, We need to implement DFS (Depth First Search)

What we are doing here is we are subtracting the coins {10,30,40,50} from 70 which is our total amount, and we will continue subtracting coins till we reach 0 or stop doing it if the output is negative. 


Let's see the code, and understand how we can solve this problem. In the below code,  we followed example 2 and the output is as expected.


We should try one more example and this time the coins[] = {1,2,3} and amount = 7.  The fewest coins combination would be 3 x 2 + 1 x 1 = 7, which means a total of 3 coins.


In the next blog, we will see another famous coin chance challenge.

Happy Coding and Keep Sharing!! Code Repo

Sunday, 2 October 2022

Data Structures and Algorithms - Problem - 1 Climbing Stairs

Today, We are going to solve a Dynamic Programming problem, and we will understand the fundamentals of Brute force and memoization. 


Problem Statement:- You are climbing a staircase, and it takes n steps to reach the top, Each time you can either take 1 or 2 steps. What we want to know is, In how many distinct ways we can climb to the top?.

Example 1:  If we want to climb two steps, so in how many ways we can climb. We have 2 options to climb.  

Option 1:- 1 Step + 1 Step
Option 2:- 2 Steps


Example 1


Example 2:  If we want to climb three steps, then we have three options to climb to the top

Option 1 Red:  1 Step + 1 Step + 1 Step
Option 2 Black: 1 Step + 2 Steps
Option 3 Green: 2 Steps + 1 Step

Example 2

So, In the above examples, We can see how many steps are required to climb 2 or 3 stairs, but it is hard to visualize, Let's try to visualize it in more ways by using a Decision Tree


Let's take n=5, where n is the number of stairs we want to climb. Using Brute Force Algorithm we are going to make decisions.


So we are starting at step zero and our goal is to reach step 5, and we can climb 1 step or 2 steps at a time, and depending on the decision we take, each outcome will lead to a different path. And we will continue to make 2 decisions at every step, and count how many steps were we able to take to reach 5. We are going to solve this recursively. 

As we can see "GREEN" 8 different paths to reach 5 and we are going to ignore the RED one. When we started the problem we are going to reach stair 5 starting from stair 0, but we had a sub-problem when we reached step 1 how many ways to reach 5. as we can see in the below Decision Tree.


So, If we are going to solve this problem like this, basically using recursion and probably using DFS (Depth- First Search), 

What would be the Time-complexity of that.? because there will be two decisions each time, it is going to (2^n).

In the below screenshot, in the red block section, they both look exactly the same, because we are solving the same sub-problem and because we are using DFS the one at the LEFT will be solved first, so why don't we save the result of that.


and when reaching RIGHT, we can say we already know the result and we don't have to draw the entire decision tree. 


Now, if we look at the other Sub-Problem which is starting at step 3, we are asking the same question how many steps to reach 5. In this case, also, the LEFT one will end up computing first, and we don't need the RIGHT side one, so let's just eliminate that. 


Let's look if we have another sub-problem, Yes at step 4, which is also exactly the same decision tree and one at the LEFT will compute first so we eliminate the RIGHT one.


After eliminating all our repeated our, the Decision Tree will end up looking like this, and this is roughly O(n), a liner time solution where we are solving only a sub-problem once. 

Where the original problem started at 0, then 1, then 2, then 3, then 4 and finally 5, This is basically DP(Dynamic Programming) where we are caching (Memoization)


THE MOST interesting part is, We now know the path to reach 5 which is our base case, There is another way to solve this by starting from the bottom which means instead of starting from Step 1 we will start computing from the TOP.


In this approach, We will start from 5 to 1. 

When we are at 5 which is our step 1
  • Then from 4 to 5, we just need to take one more step, which is 1.
  • Next is step 3, here we can take 1 step or 2 steps to reach 5. which means we can take 2 steps in total. 
  • Next From 2, If we take one step and go to 3 and since we already computed how many steps it would take from 3 to reach 5, which is 2,  so we can add that and the total number of steps need to take is 1 step+2 steps = 3 Steps.
  • If we notice and are familiar with Fibonacci numbers, that is exactly what we are doing. 😃
and we have to loop n-1 to compute all the values to get the result. Now let's do some coding, and see how much code we need to right to solve this problem.

 package com.hemkant.DSA;  
 public class ClimbingStairs {  
   public static void main(String[] args)  
   {  
     System.out.println("Number of ways = " + findSteps(5));  
   }  
   static int findSteps(int n)  
   {  
     int temp;  
     int num1 =1, num2=1;  
     for (int i=0;i<(n-1);i++)  
     {  
       temp=num1;  
       num1=num1+num2;  
       num2=temp;  
       System.out.println(num2);  
     }  
     return num1;  
   }  
 }  

Yes, that's all we need to do to solve this problem. Code Repo


Happy Coding and Keep Sharing!!

Friday, 1 October 2021

Infrastructure as Code (IaC)

Is the process where Developers and DevOps team auto-magically manages and provision tech stack for an application using a software rather than doing it manual configuration of Hardware or OS using declarative definition file. 

With IaC we can build stable environment much Faster and Scale it, we can also enforce the consistency via code. 

There is no single standard syntax for declarative IaC, different platform supports different and often multiple ,file formats as well such as YAML, JSON and XML.

IaC is supported by list of popular third party tools such as Terraform, Ansible, Puppet. In this post we will use Terraform and cloud provider will be AWS. Terraform is supported by all major cloud provider i,e GCP, Azure.

First we need to install Terraform , I am using Mac so I can use brew to install Terraform if you are on Windows or Linux you can download it from here 


Now, you might be working for different client who uses different version of terraform for that there is a quick switchTo program which you can install and its really helpful in such cases.                          

 brew install warrensbox/tap/tfswitch


Now let's use code and create Infrastructure but before that I need to configure the aws-cli and secure the key, you can put them in the env. variables or in Vault providers as well, first I would like to create a VPC, its very simple just couple of lines of code and we will see who easy it is.

provider "aws" {
region = "eu-west-1"
}

resource "aws_vpc" "myvpc" {
cidr_block = "10.0.0.0/16"
}


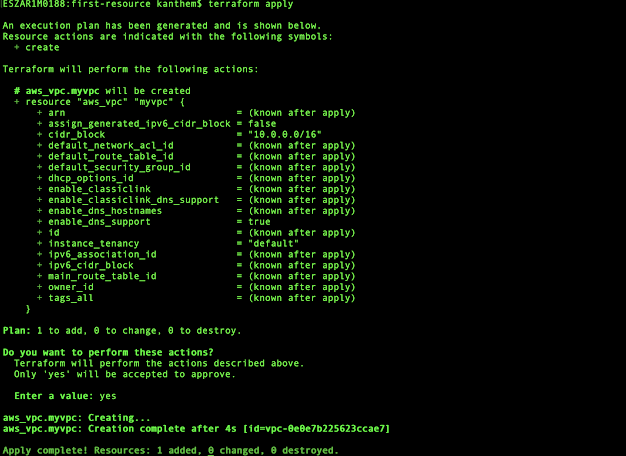
In the above code snippet, I have aws as provider and resource which I want to create is aws_vpc with cidr_block given To run this we need to execute two commands "terraform init" and "terraform apply".


Let's check the AWS console and see if we have this VPC ID 


Next , let's take an another example and create a free-tier EC2 instance with web security enabled for both ingress(Inbound) & egress(outbound). 


and we have our t2.micro EC2 instance is ready, with Security Groups for both inbound and outbound  


We saw couple of examples of IaC, how it can help us in managing and provision infrastructure using simple code and provides consistency. We can do everything that is required to manage Infrastructure.

IMPORTANT NOTE :- Use "terraform destroy" command to delete the resource.

Happy coding and keep sharing!!