Tuesday 28 February 2017

ElasticSearch Module in DXA


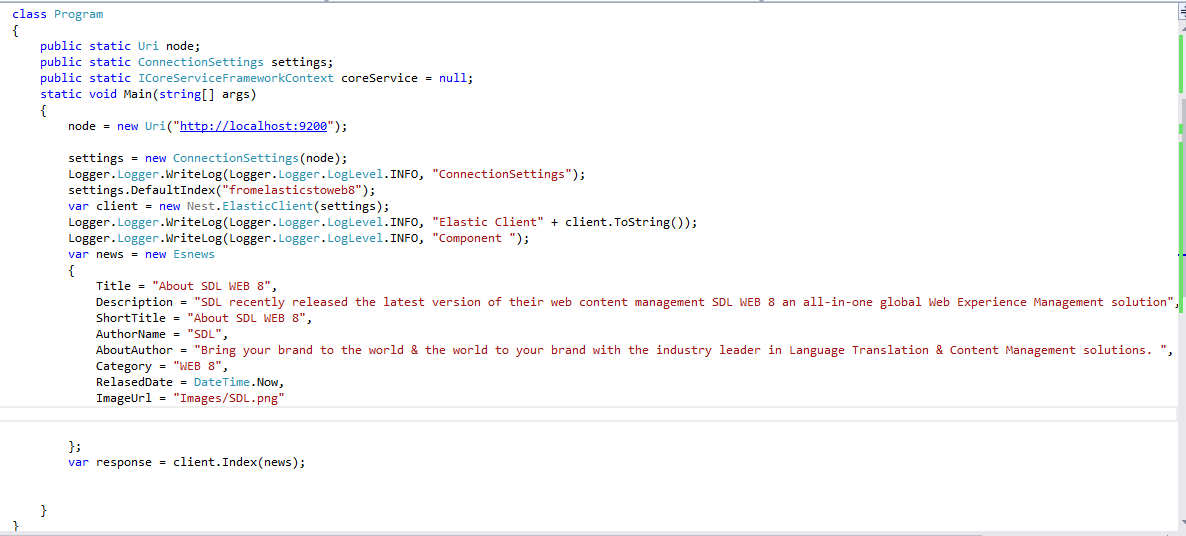
In my last two blogs we have discussed how to create components by consuming the data from Elasticsearch and then how to index data in Elasticsearch when publishing components.

Today,We are going to discuss and create Elasticsearch module in DXA which will have following features .DXA Modules allows us to extend its Functionality via creating new modules. Here we can create new modules which gives us flexibility & re-usability.

Features and Advantages :- 

  • Free text search .
  • Tag based filtering.
  • Lighting fast response powered by Elasticsearch.
  • Pagination and sorting based on fields.
  • Article detail page.

In order to use the Elasticsearch module we need to setup the storage extension and Elasticsearch which we already discussed in my previous blog here.
Once that is done using Elasticsearch module in DXA we can search the content from Elasticsearch and render on DXA based application .

Let's discuss the CMS part first.
Elasticsearch Module structure 


  1. Define module's folder structure
  2. DXA gives us predefined structure where we can keep all the building blocks of the module.
  3. For each new DXA module, we need to create a new folder in Modules Folder
  4. The name of folder is usually module name.

Next is creating the Schema and Component Templates. I have create dynamic components and index them in Elasticsearch and render on the DXA based web application.


  1. Publish all the dynamic components and index them in Elastic.
  2. Create new area in you DXA web Application.
    DXA Module
  3. We can call Elastic RESTFul API to get the data.
  4. Data will be returned in the form of JSON.
  5. Create model to deserialize the JSON.
  6. Let's search for the text SDL.
  7. Result can be further filtered based on tagging as well.
  8. Compare the search result with the data index in Elastic
    Elastic Search RESTFul API

.Happy Coding and Keep Sharing !!!

Wednesday 15 February 2017

ElasticSearch Integration 4 WEB 8


In my previous post we have discussed on how to create components by consuming data from Elastic Search.Today we are going to discuss how to index data in ElasticSearch when publishing components from WEB8.

To know more about the ElasticSearch advantages and how to setup please click here.

Steps to setup Storage extension and Generic Index service which will read data from and push in to the Elastic search.

  1. CMS setup
    • Copy and paste the templating building block (TBB) to a location on your SDL WEB 8 CM Server
    • Upload ESI4TIndexing.Templating.dll TBB to WEB 8 CMS using TcmUploadAssembly.exe
    • Create a Component Template with following attributes
      • Output Format – XML Fragment
      • Add GetComponentAsXML TBB ,Publish Binaries in Package, Link Resolver and Cleanup Template.
  2. Setup ElasticSearch
    • Download ES from here and unzip.
    • Run bin/elasticsearch (or bin\elasticsearch.bat on Windows).
    • Run http://localhost:9200.
    • Default Elasticsearch instance is up and running now.
    • With the help of Elasticsearch .NET high level client ,we can do all the CRUD operations in Elasticsearch.
  3. Setup Deployer service
    • Open the cd_storage_config.xml Storage Configuration file from the /bin/config folder and add following node under the Storages section:
      • <StorageBindings><Bundle src="CustomStorageDAOBundles.xml"/></StorageBindings>
    • Copy and paste CustomStorageConfig.xml file to change the value of following nodes
      • ServiceEndPoint - URL of the IndexService
      • TemplateIdToIndex - Tcm Id Of component Template which we have created in step 1 CMS setup. 
    • Copy the CustomStorageDAOBundles.xml XML file in the Content Delivery /bin/config folder
  4. ElasticSearch Index Service
    • Copy and paste ElasticSearch IndexService on your server host it in IIS 
    • I have used Strongly typed interface to Elasticsearch. Fluent and classic object initializer mappings of requests and responses. Uses and exposes Elasticsearch.Net
    • Run Install-Package NEST
    • Copy the configuration folder as well .
      • You can update the log files path from Logging.config inside the configuration folder
    • Update the path of configuration\logging.config file in web.config of index service
  5. Here, I have created a default index  fromelasticstoweb8 (should be in all lower case other-wise you will get the error Invalid request) and Type esnews.
  6. Once the data is indexed in the ES .
  7. REST service will return data in JSON format.
    • To get all the records http://localhost:9200/fromelasticstoweb8/_search?q=*:*
To test the index and search services
  1. Index service

    1. You can use fiddler for debugging 
    2. I have created a sample schema article
      1. title
      2. description
      3. imageurl
    3. Run index service on fiddler
      • http://localhost/Service1.svc/AddDocument
      • Input JSON which will generated by custom storage 
      • {"ServicePayload":{"DCP":"<esnews Title='About SDL WEB 8' Id='tcm:6-12273' xmlns:xlink='http://www.w3.org/1999/xlink' xmlns:tcm='http://www.tridion.com/ContentManager/5.0'><Title>About SDL WEB 8</Title><Description>SDL recently released the latest version of their web content management SDL WEB 8 an all-in-one global Web Experience Management solution</Description><shortTitle>About SDL WEB 8</shortTitle><authorName>SDL</authorName><Category>WEB 8</Category><relasedDate>2017-02-03T23:44:08.261+05:30</relasedDate><imageUrl>Images/SDL.png</imageUrl><publication Id='tcm:0-6-1' Title='400 Example Site'></publication></esnews>","LanguageInRequest":"en"}}Method Name: AddDocument
    4. Execute this request in Fidler and verify the results returned
    5. Check in ElasticSearchas well inside the collection\document which you have created and entered in the index service 
    6. Result as 0 for success and 1 for failure
      •  {"ResponseContext":{"EnvironmentContext":null,"FaultCollection":[]},"ServicePayload":{"ErrorMessage":"","Result":0}}
    7. Test this by publishing the Component as well 
    8. Log File Where Response Result :0 means successfully published and data is index in ElasticSearch.
  2. Search Service
    • To get all data http://localhost:9200/fromelasticstoweb8/_search?q=*:*
    • To get the data based on the title http://localhost:9200/fromelasticstoweb8/esnews/AVo8K0bDJVbTUFCj_OQW
  3. Here fromelasticstoweb8 is the node and esnews is type.
You can download the code here

Happy coding and keep Sharing !!!!

Saturday 4 February 2017

Connect SDL WEB 8 with Elasticsearch

What is ElasticSearch ?

Elasticsearch is an Apache Lucene-based search server. It was developed by Shay Banon and published in 2010.

Elasticsearch is a real-time distributed and open source full-text search and analytics engine. It is accessible from RESTful web service interface and uses schema less JSON (JavaScript Object Notation) documents to store data. It is built on Java programming language, which enables Elasticsearch to run on different platforms. It enables users to explore very large amount of data at very high speed.


Features of Elasticsearch are as follows:- 
  1. Elasticsearch is scalable up to petabytes of structured and unstructured data.
  2. Elasticsearch is open source and available under the Apache license version 2.0.
  3. Elasticsearch uses denormalization to improve the search performance.
  4. Elasticsearch can be used as a replacement of document stores like MongoDB.
  5. Elasticsearch is one of the popular enterprise search engines, which is currently being used by many big organizations like Wikipedia, The Guardian, StackOverflow, GitHub etc.
key concepts of Elasticsearch:-

Node:- It refers to a single running instance of Elasticsearch. Single physical and virtual server accommodates multiple nodes depending upon the capabilities of their physical resources like RAM, storage and processing power.

Cluster:- It is a collection of one or more nodes. Cluster provides collective indexing and search capabilities across all the nodes for entire data.

Index:- It is a collection of different type of documents and document properties. Index also uses the concept of shards to improve the performance. For example, a set of document contains data of a social networking application.

Type/Mapping:- It is a collection of documents sharing a set of common fields present in the same index. For example, an Index contains data of a social networking application, and then there can be a specific type for user profile data, another type for messaging data and another for comments data.

Replicas:- Elasticsearch allows a user to create replicas of their indexes and shards. Replication not only helps in increasing the availability of data in case of failure, but also improves the performance of searching by carrying out a parallel search operation in these replicas.

Shard:-  Indexes are horizontally subdivided into shards. This means each shard contains all the properties of document, but contains less number of JSON objects than index. The horizontal separation makes shard an independent node, which can be store in any node. Primary shard is the original horizontal part of an index and then these primary shards are replicated into replica shards.


Advantages
Elasticsearch is developed on Java, which makes it compatible on almost every platform.
Elasticsearch is real time, in other words after one second the added document is searchable in this engine.
Elasticsearch is distributed, which makes it easy to scale and integrate in any big organization.
Creating full backups are easy by using the concept of gateway, which is present in Elasticsearch.


Now, Lets create connect  ElasticSearch  and SDL WEB 8 and  components in CMS.

  1. Let's create an console based application using .NET 4.5.
  2. Run the following command in the Package manager console .Install-Package NEST .Install Elasticsearch .NET high level client.
  3. Download Elasticsearch click and unzip the Elasticsearch 
  4. Run ../bin/elasticsearch
  5. Run  http://localhost:9200/
  6. Default Elasticsearch instance is up and running now .
  7. With the help of Elasticsearch .NET high level client ,we can do all the CRUD operations in Elasticsearch.
  8. Here, I have created a default index  fromelasticstoweb8 (should be in all lower case other-wise you will get the error Invalid resquest) and Type esnews.
  9. So the data URL would be  http://localhost:9200/fromelasticstoweb8/esnews/AVoFKrUbqeqnhk6aE3Ca  the last parameter is the ID
  10. To get all the records http://localhost:9200/fromelasticstoweb8/_search?q=*:*
  11. Code snippet to write data in Elasticsearch node
  12. Let read all the data from node fromelasticstoweb8
  13. Using Coreservice we can create components in WEB 8 
    1. Create coreservice client using ISessionAwareCoreService.
    2. Create model Serialize that model into XML.
    3. Using coreservice client.create method we can create the components in WEB 8.
    4. I have created all the items available in ES node fromelasticstoweb8  into SDL WEB 8 as components .
  14. To know more on how to use coreservice to interact with SDL WEB 8 and create CMS items such as components ,Keywords etc you can refer my previous blogs also .


Happy Coding and Keeping Sharing !!!!!

Sunday 4 December 2016

SalesÆ’orce Integration with SDL WEB8


SalesÆ’orce-CRM

A CRM system is a business tool that allows you to manage all your customers, partners, and prospects information all in one place. The Sales Cloud (Salesforce.com’s CRM system) is a cloud based CRM system.
For example, it helps:
1.       sales teams close deals faster
2.       marketing manage campaigns and track lead generation
3.       service call centres reduce the time to resolve customer complaints

SDL WEB 8-CMS

                SDL Web covers four main core functional areas:
1.       Web Content Management
2.       Experience Optimization (including personalization)
3.       Digital Media
4.       Localization

Steps to get the SF API and how to create .NET based client

1.       Go to ap2.salesforce.com and create your developer account.
2.       Click on Setup and from quick find search for API.
3.       Select the API, Salesforce’s WSDL allows you to easily integrate salesforce.com with your applications, and to build new applications that work with salesforce.com. To get started, download a WSDL file to a place accessible to your development environment. For complete documentation, sample code, and developer community, visit
5.       I used Enterprise WSDL 
a.       A strongly typed WSDL for customers who want to build an integration with their salesforce.com organization only.
SF API

Create dummy data in SF

Dummy data is created in SF
 I have created some dummy data in Lead object which we will accessing using Enterprise WSDL  API


Read Data using .NET Client and SF API

Add SF Enterprise API as service reference in your project 
    1. Login to the Force.com API
    2. Change the binding to the new endpoint
    3. Create a new session header object and set the session id to that returned by the login
    4. Queries are executed against the Force.com API using SOQL (Salesforce.com Object Query Language).


In the screenshot, we can see that the data created in SF is accessible using .Net client.

Write Data in SF using .Net Client

  1. Instantiate the Object Being Created: Before we can execute a create() against the API, we must establish the type of object being created. In this case, we will create a new lead.
  2. Establish Field Values and Object Properties
  3. Execute Create Call and Capture Save Results
  4. Working with the Results: The create call will obviously result in success or failure. Successful create calls will return the ID value of the resultant record created. Fortunately, the API is built to allow us to handle both scenarios within our application.
  5. Data is successfully created
  6. Let’s go and check in SF online. Here you can see the details which we have supplied via .NET client is saved in SF.

Let’s integrate SF with SDL WEB 8

    1. We already have SF API and before we start the integration of SF with SDL WEB 8 we need to first create WEB 8 Core service client to get the object.
    2. Core Service is WCF based webService.
    3. I have already created core service client using ISessionAwareCoreService.
    4. After this we need to read Component data using.
    5. Deserialize the data in to the object, and send to SF API to create the records in SF.
    6. Know we have the components List from WEB 8 , run SF API create method to create new records in SF.
    7. I have created sample component in WEB 8 which is pushed in to SF
      • Below image is CMS component which is pushed to SF.
      • Salesforce UI here we can see the data which was pushed from WEB 8 is successfully created in SF.
      • So, we are successfully able to push content from WEB 8 to SF lets work on the other way around so that we can say SF and WEB 8 are in sync.
    8. To create content in WEB 8 
      • Need core service client I have re-used the same core service utility.
      • Folder Location where you want to create content.
      • Read data from SF you can check Read data from SF section for more information
      • Transform the object into XML.
      • We need to call coreService create method.
Run this service in background as Windows service or Task Scheduler  to keep SalesÆ’orce and Tridion in a sync also if you want to have, create custom SalesÆ’orce objects, and add custom fields you can also do that, in this demo I have used the default object LEAD provided by SalesÆ’orce.

Prerequisites to create custom objects in SF:

A SalesÆ’orce account in a sandbox Professional, Enterprise, Performance, or Unlimited Edition org, or an account in a Developer org.


Happy  Coding and keep Sharing !!

Sunday 27 November 2016

Cms Talk to Cms

The Value of website content


Content is what sets your website apart from the masses.The success of your website is determined primarily by its content .
The key to a successful website is having managed,relevant,clear and keyword-rich content . 

Why content is important ?

  1. It makes your brand an authority 
    • Quality content delivered on a regular basis makes your brand an authority
  2. You get to know your customers
    • Content ,when delivered through websites,social media allow for feedback.It means you can gauge your customers.
  3. Generating content improve SEO
    • Managed,relevant and keyword-rich content is very important for SEO.
  4. Content add value 

Today we are going to see how we can manage,share our content between multiple CMS. The whole idea here is how we can share the content across multiple CMS.
ArchitectureDiagram
High-Level Architecture diagram of CmsTalkToCms
Let's discuss the diagram
  1. Point A
    1. Here I have created a C# console based application which takes inputs from user and forward that request to business connector 
    2. Inputs are like
      • Read data from CMS A process it in a manner which is accepted by CMS B.
      • Mentioned the type of the data (In case of Tridion schema and for Umbraco parent document type)
      • Returns the count and details of the transaction.
      • User authentication is done at this level.
  2. Point B
    1. Business connector is the core of this architecture.
      1. It will consume all the input provide by the Client
      2. Based on that it will first call the source CMS could be point (C) or (D) .
        • Here we extract all the items which needs to share.
        • Transform the data in a manner which is accepted by the destination CMS
        • Once data transformation is done then we will call the destination CMS service which could be point (C) or (D).
        • Service will validate the data 
        • Finally data is pushed to destination CMS.
      3. Destination service
        1. Will also validate the data before performing CRUD operation
        2. Service will check if any item in the list send by the source already exist
        3. If yes will run update else create new item.
    2. After all the data is either updated created or rejected the response will be send back to the business connector and business connector share that response with the client Point A.
  3. Point C
    1. I have created Custom web service .ASMX 
    2. Using Umbraco.core DLL provided by Umbraco.
    3. Using this DLL we can perform all the CRUD operations. 
      service
      Point (C) Content Service used for CRUD operations 
  4. Point D
    1. Tridion core service is used for CRUD operations.
    2. ISessionAwareCoreService is used to create the core service client. 

Sunday 30 October 2016

News and Article Module In DXA

Why Fresh Content is Critical for Your Website?
  1. Keep Your Audience Informed and Updated
  2. Fresh Content Increases Your Authority Potential
  3. More Content, More Keywords
  4. Google Loves Frequent Updates
So, add an article, an image or just make some change on your site to get noticed. The easiest and most effective way to stay fresh is to add a blog on your site and continue to add articles that will get noticed by your viewers.

Today,We are going to discuss and create News and Article module in DXA which will have following features  .DXA Modules allows us to extend its Functionality via creating new modules. Here we can create new modules which gives us flexibility & re-usability.
  1. Article searching
  2. Tag based filtering 
  3. Article list and detail articles 
  4. Author details page 
Let's discuss the CMS part first.
CMS structure
  1. Define module's folder structure
  2. DXA gives us predefined structure where we can putting all the building blocks of the module.
  3. For each new DXA module, we need to create a new folder in Modules Folder
  4. The name of folder is usually module name.
Next is creating the Schema and Component Templates. I have used dynamic components which render on the landing page as a list of articles and with details page link.

You need to create dynamic CT for the list of articles

Dynamic Component Template
Publish all the Dynamic Article components .
Dynamic N&M Components

To read dynamic Components we need to query Broker DB.
Get Article Dynamic Components ID

Build Criteria based on you will get the data from Broker DB
Now ,Let's see the Content Delivery 
New Area called NewsAndArticle in DXA 
Create new area in you DXA web Application. Here i have created Models,and helper class to get the data from broker using Broker Queries.

Register your views in NewsAndArticleAreaRegistration.cs . Once done now let run the application .

1. News and Article Landing Page
Landing Page
Here you can see list of articles are rendering from Broker DB using broker query .Using this view we can search an article ,filter by category and view the author details.

2. Search will search in the intro Text in metadata.
Search result
3. Filter your result based on Tags click on tag.
Result based on tags

4. Click on read more link for Article Details page 
Article details page
5. Author Details Page .
Author page

Happy coding and keep sharing !!!!

Saturday 8 October 2016

FormBuilder Module in DXA Content Delivery Settings

My First DXA Module - Form builder Step by Step  cont'd


In Previous post, we have discussed on the CMS Part of the DXA module. now lets discuss the CDA part

Step 1. Download the DXA framework Here
Step 2. I have created new area called FormBuilder 


Step 3. Create a ViewModel based on FormBuilder Schema

Step 4. Lets create Login.CHTML View which will consume the FormBuilder ViewModel and render the userControl based on the formFields attached to it.


Last Step is to update the form FormBuilderAreaRegistration.cs


Build and run the solution .In below screen shot you can see the form is rendering.

We have completed the Formbuilder Module this is a very basic Formbuilder soon i will be adding more functionality like custom error message and data save/authentication functionality .

Happy Coding and Keep Sharing !!!!