Showing posts with label ISessionAwareCoreService. Show all posts

Sunday, 4 December 2016

Salesƒorce Integration with SDL WEB8


Salesƒorce-CRM

A CRM system is a business tool that allows you to manage all your customers, partners, and prospects information all in one place. The Sales Cloud (Salesforce.com’s CRM system) is a cloud based CRM system.
For example, it helps:
1.       sales teams close deals faster
2.       marketing manage campaigns and track lead generation
3.       service call centres reduce the time to resolve customer complaints

SDL WEB 8-CMS

                SDL Web covers four main core functional areas:
1.       Web Content Management
2.       Experience Optimization (including personalization)
3.       Digital Media
4.       Localization

Steps to get the SF API and how to create .NET based client

1.       Go to ap2.salesforce.com and create your developer account.
2.       Click on Setup and from quick find search for API.
3.       Select the API, Salesforce’s WSDL allows you to easily integrate salesforce.com with your applications, and to build new applications that work with salesforce.com. To get started, download a WSDL file to a place accessible to your development environment. For complete documentation, sample code, and developer community, visit
5.       I used Enterprise WSDL 
a.       A strongly typed WSDL for customers who want to build an integration with their salesforce.com organization only.
SF API

Create dummy data in SF

Dummy data is created in SF
 I have created some dummy data in Lead object which we will accessing using Enterprise WSDL  API


Read Data using .NET Client and SF API

Add SF Enterprise API as service reference in your project 
    1. Login to the Force.com API
    2. Change the binding to the new endpoint
    3. Create a new session header object and set the session id to that returned by the login
    4. Queries are executed against the Force.com API using SOQL (Salesforce.com Object Query Language).


In the screenshot, we can see that the data created in SF is accessible using .Net client.

Write Data in SF using .Net Client

  1. Instantiate the Object Being Created: Before we can execute a create() against the API, we must establish the type of object being created. In this case, we will create a new lead.
  2. Establish Field Values and Object Properties
  3. Execute Create Call and Capture Save Results
  4. Working with the Results: The create call will obviously result in success or failure. Successful create calls will return the ID value of the resultant record created. Fortunately, the API is built to allow us to handle both scenarios within our application.
  5. Data is successfully created
  6. Let’s go and check in SF online. Here you can see the details which we have supplied via .NET client is saved in SF.

Let’s integrate SF with SDL WEB 8

    1. We already have SF API and before we start the integration of SF with SDL WEB 8 we need to first create WEB 8 Core service client to get the object.
    2. Core Service is WCF based webService.
    3. I have already created core service client using ISessionAwareCoreService.
    4. After this we need to read Component data using.
    5. Deserialize the data in to the object, and send to SF API to create the records in SF.
    6. Know we have the components List from WEB 8 , run SF API create method to create new records in SF.
    7. I have created sample component in WEB 8 which is pushed in to SF
      • Below image is CMS component which is pushed to SF.
      • Salesforce UI here we can see the data which was pushed from WEB 8 is successfully created in SF.
      • So, we are successfully able to push content from WEB 8 to SF lets work on the other way around so that we can say SF and WEB 8 are in sync.
    8. To create content in WEB 8 
      • Need core service client I have re-used the same core service utility.
      • Folder Location where you want to create content.
      • Read data from SF you can check Read data from SF section for more information
      • Transform the object into XML.
      • We need to call coreService create method.
Run this service in background as Windows service or Task Scheduler  to keep Salesƒorce and Tridion in a sync also if you want to have, create custom Salesƒorce objects, and add custom fields you can also do that, in this demo I have used the default object LEAD provided by Salesƒorce.

Prerequisites to create custom objects in SF:

A Salesƒorce account in a sandbox Professional, Enterprise, Performance, or Unlimited Edition org, or an account in a Developer org.


Happy  Coding and keep Sharing !!

Sunday, 27 November 2016

Cms Talk to Cms

The Value of website content


Content is what sets your website apart from the masses.The success of your website is determined primarily by its content .
The key to a successful website is having managed,relevant,clear and keyword-rich content . 

Why content is important ?

  1. It makes your brand an authority 
    • Quality content delivered on a regular basis makes your brand an authority
  2. You get to know your customers
    • Content ,when delivered through websites,social media allow for feedback.It means you can gauge your customers.
  3. Generating content improve SEO
    • Managed,relevant and keyword-rich content is very important for SEO.
  4. Content add value 

Today we are going to see how we can manage,share our content between multiple CMS. The whole idea here is how we can share the content across multiple CMS.
ArchitectureDiagram
High-Level Architecture diagram of CmsTalkToCms
Let's discuss the diagram
  1. Point A
    1. Here I have created a C# console based application which takes inputs from user and forward that request to business connector 
    2. Inputs are like
      • Read data from CMS A process it in a manner which is accepted by CMS B.
      • Mentioned the type of the data (In case of Tridion schema and for Umbraco parent document type)
      • Returns the count and details of the transaction.
      • User authentication is done at this level.
  2. Point B
    1. Business connector is the core of this architecture.
      1. It will consume all the input provide by the Client
      2. Based on that it will first call the source CMS could be point (C) or (D) .
        • Here we extract all the items which needs to share.
        • Transform the data in a manner which is accepted by the destination CMS
        • Once data transformation is done then we will call the destination CMS service which could be point (C) or (D).
        • Service will validate the data 
        • Finally data is pushed to destination CMS.
      3. Destination service
        1. Will also validate the data before performing CRUD operation
        2. Service will check if any item in the list send by the source already exist
        3. If yes will run update else create new item.
    2. After all the data is either updated created or rejected the response will be send back to the business connector and business connector share that response with the client Point A.
  3. Point C
    1. I have created Custom web service .ASMX 
    2. Using Umbraco.core DLL provided by Umbraco.
    3. Using this DLL we can perform all the CRUD operations. 
      service
      Point (C) Content Service used for CRUD operations 
  4. Point D
    1. Tridion core service is used for CRUD operations.
    2. ISessionAwareCoreService is used to create the core service client. 

Monday, 30 May 2016

Exchange Integration 4 Tridion-Ei4T

Introduction 

Exchange Integration 4 Tridion-Ei4T is intent to provide the Tridion integration with Microsoft Exchange server to read emails and create components in SDL Tridion.


Ei4T-High Level Architecture
SETUP

Below are various set-up step and prerequisites 
  1. Dedicated Email-Id is required on which service will keep on checking for emails
  2. Task scheduler to schedule the service.
  3. Custom validator will get EWS url.
  4. Task scheduler and Exchange Service SearchFilter ItemSchema.DateTimeReceived time Interval
    should be in sync 
  5. Make sure you select right version of Exchange.I am using ExchangeVersion.Exchange2013 
  6. Publish component only if its marked as item.Importance == "High" again this is configurable
  7. Create Tridion coreService client using ISessionAwareCoreService
  8. Create model as Serializable
  9. Copy the configuration folder/logging.config file and update the path in app.config
  10. Update App.Config 
    1. coreService Url
    2. Exchange Dedicated Email-ID/Password
    3. Schema ID
    4. Folder ID
    5. Publication Target ID
    6. CM userid/password to run coreService
  11. Email format


You can Download the code from here.

Happy Coding and Keep Sharing !!!

Monday, 16 May 2016

Creating Components in SDL Tridion using MongoDB Data Feed

In one of my previuos post we've discussed how to create components in SDL Tridion using MSSQLServer as a DataSoucre but today we are going to create components in SDL Tridion using MongoDB as a DataSource


We are going to use SDL Tridion CoreService,MonoDB 3.2.6 ssl-signed and C# as a language

You can download MongoDB from here and to know more about MongoDB here

Create an empty solution

  1. MongoDb.Client
    • C# Console Based Application Running on .NET 4.5
    • which will get the data from mongoDB
  2. MongoDBToTridion.BAL
    • In this Class Liabrary  i have written all the logic in order to create component.
  3. Install MongoDB Drivers
    • Install-Package MongoDB.Driver
  4. Create SDL Tridion CoreService Client
    • ISessionAwareCoreService
  5. Create a model name Article as Serializable
  6. I have also create a Database called customerDatabase in MongoDB
  7. In my customerDatabase i have create document name article which we will use to create component
  8. Main Method which is starting point of this application 

     
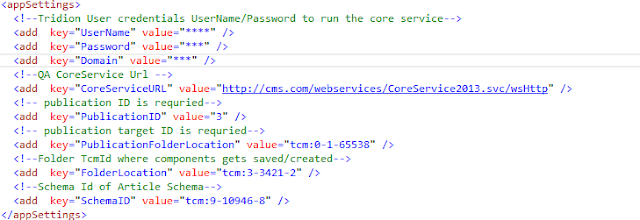
      9.Update appsettings key in app.config file 


     10. Process List<Article>


   11.Serialize article model


  12.Create or update Component in Tridion 


 Compare your Data in MongoDB with components created in Tridion


All the data which are available in Article Document in MongoDB has been successfully  created as Components in Tridion .


Open Component and check 


You can download the code from here


Happy Coding and keep Sharing !!!!

Friday, 29 April 2016

WCF RestService over CoreService

WCF RestService over CoreService 

Introduction 

This service is created to get data from SDL Tridion CM Database ,currently this service is tested with SDL Tridion 2013 SP1


In this service you will see many methods are exposed and message format JSON and XML output.

Methods which are available
  1. GetComponentByTcmUri
  2. GetSchemaByTcmUri
  3. GetAllCategoriesWithInPubByTcmUri
  4. GetKeywordByCategoryID
  5. GetPageTempletByPubID
  6. GetComponentTemplateByPubID
  7. GetTemplateBuildingBlockByPubID
  8. GetPageByPubID
  9. GetStructureGroupByPubID
  10. GetMultimediaComponentByPubID
  11. GetPublicationList
  12. GetUserList 


Example
To request a categories from the Tridion CM Database.
http://domainname/RestService.svc/GetAllCategoriesWithInPubByTcmUri/{TCMURI}/{messageformat}
http://domainname/RestService.svc/GetAllCategoriesWithInPubByTcmUri/0-1048-1/JSON

You can download the code from here

Happy coding and keep sharing :)

Friday, 4 March 2016

Drop down on page (DD4T MVC)should be in sync with Custom database. Create Keywords update Component and publish page

Requirement :- All filter drop down on DD4T MVC page should be in sync real-time with custom database


All the above drop-down are populating based on category and keywords.So we need to read client database create  keyword update the component presentation of filter component and publish the page.


Here, I have created the C# console application which keep on running and making sure that the SQL database and tridion taxonomies are in sync.


I have escaped the code of SQL connectivity and loops to iterate the data :)  
  1. Create core service ISessionAwareCoreService Client
public static class CoreServiceConnectionScheme
    {
        public const String netTcp = "net.tcp";
        public const String wsHttp = "http";
        public const String undefined = "undefined";
    }

    public static class CoreServiceFactory
    {
        public static ICoreServiceFrameworkContext GetCoreServiceContext(Uri endpointUri, NetworkCredential windowsNetworkCredentials)
        {
            switch (endpointUri.Scheme.ToLower())
            {
                case CoreServiceConnectionScheme.wsHttp:
                    return GetWsHttpContext(endpointUri, windowsNetworkCredentials);
                case CoreServiceConnectionScheme.netTcp:
                    return GetNetTcpContext(endpointUri, windowsNetworkCredentials);
                default:
                    throw new ArgumentException("The uri connection scheme specified [{0}] is invalid; a valid scheme (ie. http for WsHttp, or net.tcp for NetTcp must be specified).");
            }
        }
public static ICoreServiceFrameworkContext GetWsHttpContext(Uri endpointUri, NetworkCredential windowsNetworkCredentials)
        {
return new CoreServiceFrameworkWsHttpContext(endpointUri, windowsNetworkCredentials);
        }
public static ICoreServiceFrameworkContext GetNetTcpContext(Uri endpointUri, NetworkCredential windowsNetworkCredentials)
        {
return new CoreServiceFrameworkNetTcpContext(endpointUri, windowsNetworkCredentials);
        }
    }


   2. Go to Main method 


static void Main(string[] args)
{
Logger.WriteLog(Logger.LogLevel.INFO, "Calling Keyword creation process");           
CreateKeywords.Process();
Logger.WriteLog(Logger.LogLevel.INFO, "Calling Keyword creation process End"); 
}

    3. Create a class

public class CreateKeywords

{   
public static ICoreServiceFrameworkContext coreService = null;
public static void Process()
{
XmlDocument doc = new XmlDocument();
coreService = CoreServiceFactory.GetCoreServiceContext(new Uri(ConfigurationManager.AppSettings["CoreServiceURL"].ToString()), new NetworkCredential(ConfigurationManager.AppSettings["UserName"].ToString(), ConfigurationManager.AppSettings["Password"].ToString(), ConfigurationManager.AppSettings["Domain"].ToString()));

#region Creating Keywords and updating component
Logger.WriteLog(Logger.LogLevel.INFO, "Checking keyword already exist in tridion or not");  
TridionObjectInfo obj = Helper.GetTridionObject(coreService, ItemType.Keyword, "tcm:1-440-512", "Test");
var tcmID = obj.ObjectCount == 0 ? TridionKeyword.GenerateKeyword(coreService, "3 Test", "Test", "tcm:1-440-512") : "";
Logger.WriteLog(Logger.LogLevel.INFO, "Returned Tcmuri of keyword " + tcmID);

ComponentData component = (ComponentData)coreService.Client.Read(ConfigurationManager.AppSettings["CompId"].ToString(), new ReadOptions());

4. Create new element in component.Content XML 

doc.LoadXml(component.Content);
XmlElement createchild = doc.CreateElement("Filter1");
createchild.InnerText = 3 Test;
doc.DocumentElement.AppendChild(createchild);
component.Content=doc.InnerXml;

component.Id = ConfigurationManager.AppSettings["CompId"].ToString();
Logger.WriteLog(Logger.LogLevel.INFO, "Updating Component " + component.Id);
component = (ComponentData)coreService.Client.Update(component, new ReadOptions());


 Logger.WriteLog(Logger.LogLevel.INFO, "Updating Component done " + component.Id + "Sending page for publishing " + ConfigurationManager.AppSettings["PageId"].ToString());

}

5.To Generate Keywords


public static string GenerateKeyword(ICoreServiceFrameworkContext coreService, string value, string key, string CategoryID)
        {
            try
            {
                KeywordData keyword = (KeywordData)coreService.Client.GetDefaultData(ItemType.Keyword, CategoryID);
                keyword.Id = "tcm:0-0-0";
                keyword.Title = value;
                keyword.Key = key;

                keyword = (KeywordData)coreService.Client.Create(keyword, new ReadOptions());
                Logger.WriteLog(Logger.LogLevel.INFO, "KeyWord TcmID :" + keyword.Id.ToString() + " Under category ID" + CategoryID);
                return keyword.Id.ToString();
            }
            catch(Exception ex)
            {               
                Logger.WriteLog(Logger.LogLevel.ERROR, "GenerateKeyword :" + ex.Message);             
                return "";
            }
           
6. To Publish Use

coreService.Client.Publish(new[] { PageId}, pubData, new[] { target.ToString() }, PublishPriority.High, null);


7. On your DD4T Mvc App you can bind dropdown with keywords

<select id="Filter1">                    
@if (Model.Fields.ContainsKey("Filter1"))
{
foreach (var value in Model.Fields["Filter1"].Keywords)
{
<option value="@value.Key">@value.Title</option>                       
}
}
</select>


Happy Coding and keep Sharing !!!!